The Employees master file allows you to add, edit, delete, and print employee records for the individuals who receive wages for work at your company. The employee record stores information for the employee's emergency contacts, deductions, direct deposit, and employee benefits and contributions.
To access the Employees window, go to Payroll > Master Files > Employees or click the Employees button on the main Payroll window. [+]
The following tasks can be performed from this window:
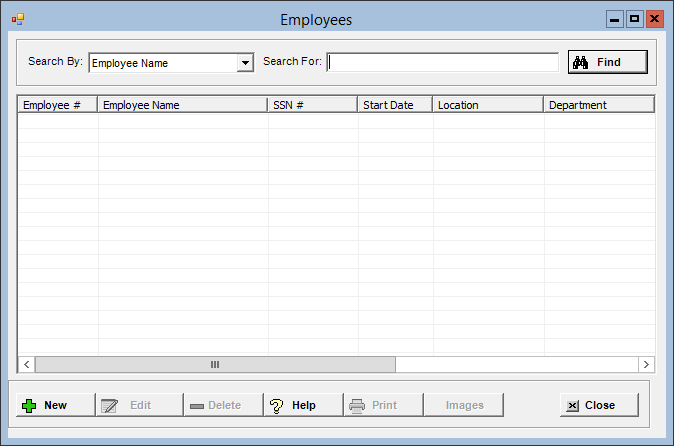
To display all employees on file, click Find without entering any search criteria. The grid displays the employees by Employee Name in alphanumeric order. You can click any column heading to sort the list based on that column. Click the column heading again to reverse the order (i.e., ascending or descending).
Change or narrow your search results by entering specific search criteria:
In the Search By field, use the drop-down list to select how you want to search the list and sort the results. Select from the following sort options: Department, Employee Name, Employee Name(Phonetic), Employee No, Location, Position, or SSN.
In the Search For field, enter the specific term to search for based on the Search By field choice. Enter all or part of the term to retrieve all records that match the criteria.
Click Find to display the search results in the grid.
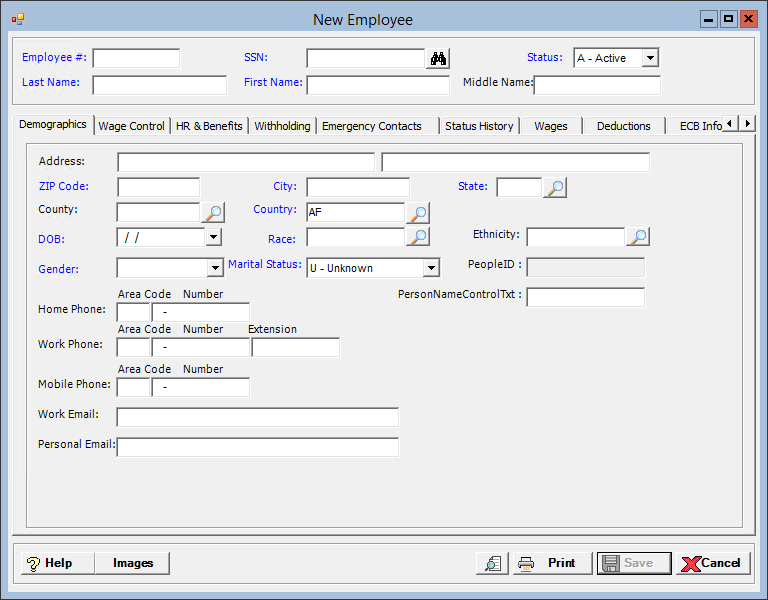
Click New located at the bottom of the Employees window. The New Employee window is displayed. [+]
In the Employee # field, enter the code to assign to the employee (nine-character, alphanumeric).
In the SSN# field, enter the employee's Social Security Number.
In the Status field, use the drop-down list to select the code that identifies the employee's status at your facility: A – Active, O – On Leave, or T – Terminated.
The Status field is automatically updated based on the most recent status history record on the Status History tab. However, this field is not updated when a status history record is added, edited, or deleted for an FMLA or LOA status; you must manually change the employee's status between Active and On-Leave in this case.
Enter the employee's last name in the Last Name field and the first name in the First Name field.
(Optional) Enter the employee's middle name the Middle Name field.
Enter the required information in the following tabs beginning with the Demographics and Wage Control tabs. Once the required information is entered on these tabs, click Save to save the employee record and proceed to the other tabs within the New Employee screen.
After you have entered information in all of the tabs within the Employees window, click Save to save the employee record and remain in the window, or click Cancel to close the window without saving.
Use the Preview (magnifying glass) and Print buttons in the Add/Edit Employee window to generate an Employee General Details report for the selected employee. Click Preview to display the report in the Report Viewer, where you can save the list to the PC/network or print the list to an assigned printer. See To preview the report for more information on options within the viewer. Click Print to print the report to the default printer.
The Images button in the Employees and Add/Edit Employee windows allows you to access the Document Viewer where you can view or work with scanned documents and images for the selected employee based on your user permissions. Consult with your system administrator if you need access to this functionality. Click the Help icon within the Document Viewer to access detailed information on the various functions available to you.
A history of changes made to the person's demographics (name, address, and other general demographic information) is viewable in People screen in the Centriq Administration application.
The Edit button allows you to edit the employee field values or to change the employee's employment status.
In the Employees window, find and select the employee record that you want to edit.
Click Edit. The Edit Employee window is displayed.
Edit the fields as needed; refer to the field descriptions from To create an employee record (above).
Click Save to save your changes and close the window, or click Cancel to exit without saving.
Follow the instructions below to delete a employee record from the master file. NOTE: You can also choose to change the employee's employment status, rather than delete it, by changing the Status field in the edit screen.
In the Employees window, find and select the employee record that you want to delete.
Click Delete. A verification message is displayed.
Click Yes to delete the record, or click No to keep it.
Follow the instructions below to display and/or print a list of employees on file.
In the Employees window, choose your search criteria and click Find to display the employee records that you want to print. All records that are visible in the grid will be included in the report.
Click Print. The report is displayed in the Report Viewer where you can save the list to the PC/network or print the list to an assigned printer. See To preview the report for more information on options within the viewer.