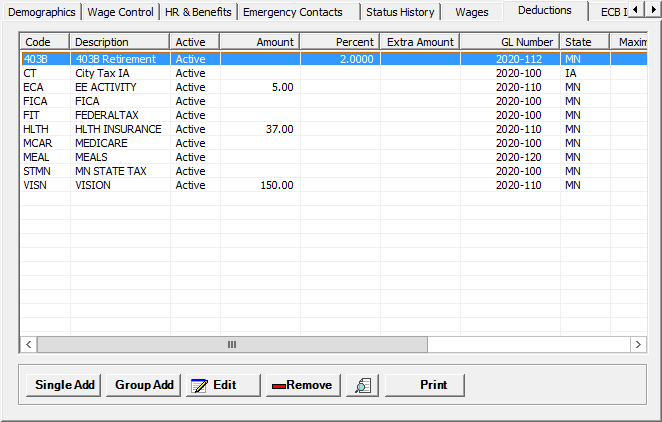
The Deductions tab on the Add/Edit Employee window stores all of the deductions that are taken out of an employee’s paycheck. For new employees, the table within the Deductions tab should be populated with all entries created for tax deductions in the Deductions window in the Master Files menu. [+]
The following tasks can be performed on this tab:
Follow the instructions below to add multiple deductions to the employee record at one time.
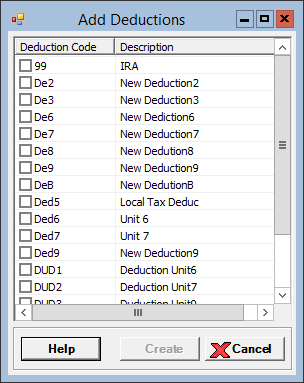
On the Deductions tab, click the Group Add button. The Add Deduction window is displayed. [+]
The Add Deductions window lists the full description of each deduction and corresponding code. Under the Deduction Code column, check each deduction code box that applies to the employee.
Click Create to save the deduction entries and close the window, or click Cancel to close the window without saving.
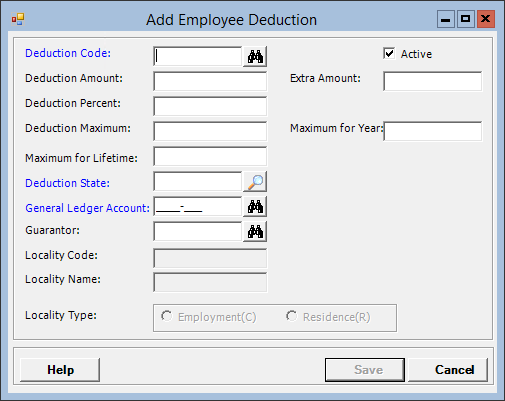
On the Deductions tab, click the Single Add button. The Add Employee Deduction window is displayed. [+]
In the Deduction Code field, click the Find button to search for and select the specific reduction to the employee’s gross wage.
In the Deduction Amount field, enter the specific deduction amount. The system will enter two decimal places when you click in another field or press the <Tab> key.
In the Extra Amount field, enter the amount to add to the tax deduction after the amount is calculated from the tax tables.
In the Deduction Percent field, enter the specific percentage deducted from the employee’s paycheck. The system will enter two decimal places when you click in another field or press the <Tab> key. A value will display by default if Default Percent field value is entered for the deduction code in the Deductions master file.
In the Deduction Maximum field, enter the maximum dollar amount that can be deducted from the employee’s paycheck.
In the Maximum for Year field, enter the maximum dollar amount that can be deducted from the employee’s paycheck for a year.
In the Maximum for Lifetime field, enter the maximum dollar amount that can be deducted from the employee's wages over their lifetime.
In the Deduction State field, click the Search button to select the state associated with the deduction. This is important for deferrals and 125 plan deductions.
In the General Ledger Account field, click the Find button to search for and select the liability account needed to create the credit for the deduction.
In the Guarantor field, click the Find button to search for and select the guarantor associated with the deduction. This would be used in the case of a deduction relating to the Accounts Receivable division within a company.
The Locality Code, Locality Name, and Locality Type fields are available when the deduction code is set up with Unit = 5 - Local Tax and Default State = Ohio. The Locality Code and Locality Name field values are displayed and cannot be edited. In the Locality Type field, select Employment (C) (default) or Residence (R). (NOTE: The Deduction Percent for this tax will default if the Default Percent field is entered for the deduction code in the Deductions master file.)
The Active check box defaults to checked, indicating that the employee deduction is active. Uncheck the box to make the employee deduction inactive.
Click Save to save the deduction entry. The deductions are displayed in the table within the Deductions tab. Click Cancel to close the Add Deduction window without saving.
On the Deductions tab, select the deduction that you want to edit.
Click Edit. The Edit Employee Deduction window is displayed.
Edit the fields as needed; refer to the field descriptions from To add an single deduction (above).
Click Save to save your changes and close the window, or click Cancel to close the window without saving.
Follow the instructions below to remove a deduction from the Employee record if it is not in use. NOTE: You can also choose to deactivate the deduction rather than delete it, by unchecking the Active box in the edit screen.
On the Deductions tab, select the deduction that you want to remove.
Click Remove. A verification message is displayed.
Click Yes to delete the record, or click No to keep it.
On the Deductions tab, click the Preview button (located to the left of the Print button) to view the Employee Deduction Details report in the Report Viewer, or click Print to print the report to the designated printer. See To preview the report for more information on options within the viewer.