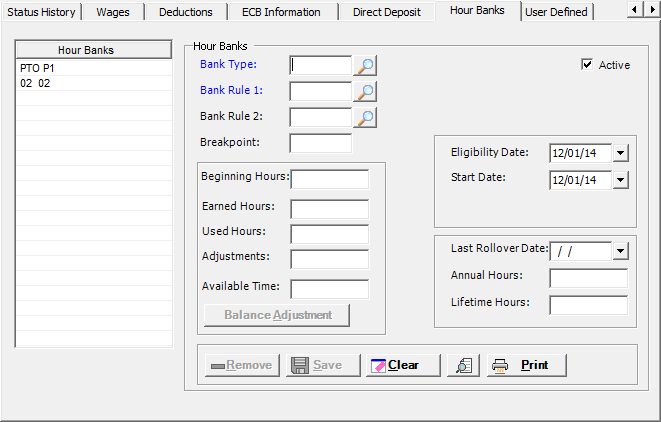
The Hour Bank tab on the Add/Edit Employee window stores the hour benefit types assigned to employees. Sick time hours, PTO bank hours, and long-term illness hours are some examples of hour banks. [+]
The following tasks can be performed from this window:
In the Bank Type field, click the Search button to select the type of hour benefit for the employee.
In the Bank Rule 1 field, click the Search button to select the hour bank rule that is used to calculate the accrual of hours into the hour bank if the number of hours worked for the period is equal to or greater than the breakpoint.
(Optional) In the Bank Rule 2 field, click the Search button to select the rule that is used to calculate the accrual hours into the hour bank if the number of hours worked for the period is less than the breakpoint.
(Optional) In the Breakpoint field, enter the number of hours worked in the accrual period as defined in the Bank Rule 1 field.
The Eligibility Date field defaults to the employee's date of hire. To edit, click the calender drop-down to select the date when the accumulated hours can be used.
The Start Date field defaults to the employee's date of hire. To edit, click the calendar drop-down to select the date the hour bank rule goes into effect.
The Last Rollover Date identifies the date when the accrual year began. This field is updated during the annual hour bank reset and roll process. To edit, click the calendar drop-down to select the date the hour bank rule goes into effect.
The Active check box defaults to checked, indicating that the bank hour record is active. Uncheck the box to make the hour bank record inactive.
Click Save within the Hour Banks tab to save the hour bank entry.
After you have saved the hour bank, you may enter another entry. To clear the fields, click the Clear button. Enter the hour bank information and click Save.
The following fields are view-only. You can adjust hour balances using the Balance Adjustment button based on user permissions (see To enter an adjustment below).
Beginning Hours: identifies the number of hours available at the start of the accrual year.
Earned Hours: identifies the number of hours earned under these hour bank rules within the year.
Used Hours: identifies the number of hours the employee was paid from this hour bank.
Adjustments: identifies the total number of adjustments that have occurred since the last rollover.
Available Time: identifies the net value of beginning hours + earned hours - used hours - adjustments (e.g., 100 + 20 - 10 - 30 = 80 Available Time).
Annual Hours: identifies the number of hours worked under the selected hour bank rules within the year.
Lifetime Hours: identifies the number of hours worked under this hour bank rule as long as the employee has worked.
The Earned, Used, Adjustments, and Annual Hours are reset
to zero whenever a rollover event occurs. The rollover history record
will always mark the beginning of the new annual hour bank period. Detail
transactions are captured for each hour earned, used, adjusted, and lost
due to limits. This allows you to report on historical date ranges back
to each hour bank's initial history record.
Adjustments made to dates prior to the most recent rollover history record
do not trigger the rollover again. Users should consider how the rollover
would have affected such adjustments. It may necessary to make further
adjustments after the rollover date to ensure the employee's current balances
are correct.
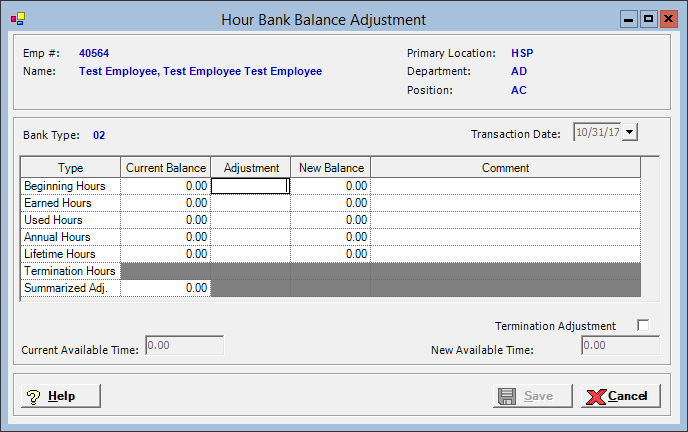
Select an hour bank in the left-hand table, and click Balance Adjustment. The Hour Bank Balance Adjustment window is displayed. [+]
The current balances are displayed for each type of hour. In the Adjustment field for the relevant hour balance, enter the amount (positive or negative) of the adjustment, and press <Tab>. The New Balance field is updated to reflect the adjustment.
In the Comment field, enter any comments regarding the adjustment. NOTE: Comments are not allowed when no adjustment amount exists.
The following message is displayed when a comment greater than 200 characters is entered: Your comment has surpassed the allowable length of 200 characters. Please shorten your comment.
Check the Termination Adjustment box to activate and enter Termination Hours information.
The Current Available Time field displays the available time balance before any adjustments are made. The New Available Time field is updated as adjustment values are entered.
Click Save to save adjustments and return to the Hours Bank tab, or click Cancel to exit without saving adjustments. All the Hours, Adjustments, and Available Time fields are updated based on the entered adjustments. The Summarized Adjustments field displays the current balance as the net of the previous adjustments entered since the last rollover.
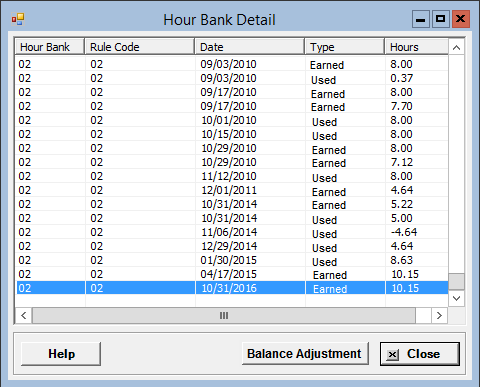
When the Hours Bank tab is viewed from the Employee Inquiry window, the Status History button is available to view the detail records for all transaction types (shown below), and enter adjustment amounts for a transaction as needed.
- This feature allows adjustments into previous year balances.
User permissions should be set up with this feature in mind.
- The initial history record is highlighted yellow in the grid. If you
select a record prior to the initial history record, the message, Adjustments cannot
be created for dates that are earlier than the initial history record
date, is displayed.
1 = Earned Hours
2 = Used Hours
3 = Rollover Adj
4 = Accumulation Adj
5 = Beginning Adj
6 = Earned Adj
7 = Used Adj
8 = Annual Adj
9 = Lifetime Adj
10 = Termination Adj
Click the Status History button at the bottom of the Hours Banks tab. The Hour Bank Detail window is displayed. [+]
In the Hour Bank Detail window, select the transaction that you want to edit.
Click Balance Adjustments. The Hour Bank Balance Adjustment window is displayed.
Enter adjustment amounts as needed; refer to To enter an adjustment from the Employee screen (above) for field descriptions.
Click Save. The adjustment is recorded to the selected transaction date and the employee's hour bank balance is updated.
Follow the instructions below to edit an hour bank record.
On the Hour Banks tab, select the hour bank record that you want to edit. The Hour Bank field values are displayed.
Edit the fields as needed; refer to the field descriptions from To add an hour bank record (above).
Click Save to save your changes.
You cannot remove an hour bank rule that is currently in use.
Follow the instructions below to remove a hour bank record from the employee record.
On the Hour Banks tab, select the hour bank record that you want to remove.
Click Remove. A verification message is displayed.
Click Yes to delete the record, or click No to keep it.
On the Hour Banks tab, click the Preview button (located to the left of the Print button) to view the Employee Hour Bank Details report in the Report Viewer, or click Print to print the report to the designated printer. See To preview the report for more information on options within the viewer.