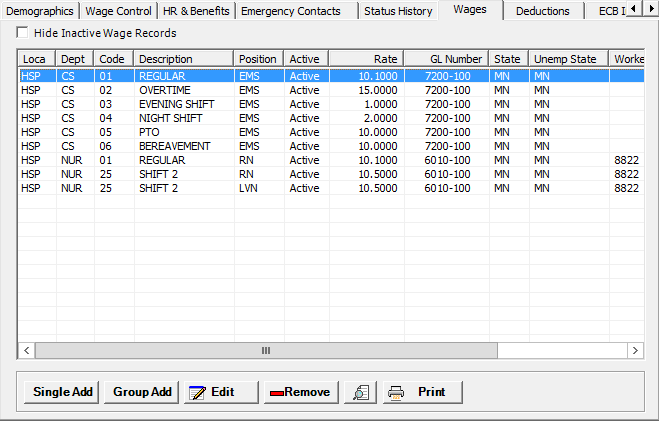
The Wages tab on the Add/Edit Employee window stores the individual wage entries for the employee. Wage codes (e.g., hourly, funeral leave) can be added individually or in a group. [+]
The following tasks can be performed on this tab:
Click the Hide Inactive Wage Reports box to show only active wage codes. Leave unchecked to display all wage records for the employee.
A wage record is considered inactive when the Active box is unchecked for the employee wage record on the Edit Single Wage screen. It is NOT based on any other inactive component of the wage record at the master file level (such as location, department, location department, or wage code master).
You can click any column heading to sort the list based on that column. Click the column heading again to reverse the order (i.e., ascending or descending).
Example of wage records on the Wages tab [+]
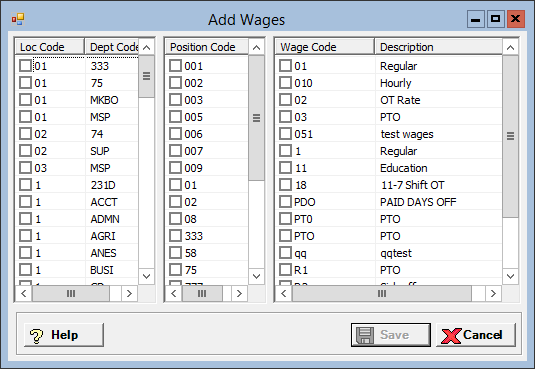
Follow the instructions below to add multiple wage records to the employee record at one time based on location/department and position.
On the Wages tab, click the Group Add button. The Add Wages window is displayed. [+]
The Add Wages window is divided into three columns: Loc Code / Dept Code, Position Code, and Wage Code. Click the appropriate check boxes under each column for each wage code you wish to add by location/department and position.
Click Save to save the entries and close the window, or click Cancel to close the Add Wages window without saving. Saved wage records are displayed in the grid on the Wages tab.
The following message is displayed if the employee's withholding information has not been completed: Before using the Group Add feature, you must complete the employee's state withholding information on the Withholding tab. Click OK, then select the Withholding tab to enter and save the federal and state withholding information. Then, return to the Wages tab to complete the Group Add function.
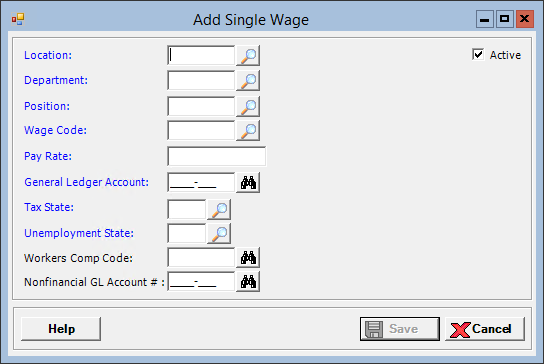
Follow the instructions below to add a single wage record to the employee record.
On the Wages tab, click the Single Add button. The Add Single Wage window is displayed. [+]
In the Location field, click the Search button to select the location where the work was performed.
In the Department field, click the Search button to select the department to be billed for the work.
In the Position field, click the Search button to select the type of work that was done.
In the Wage Code field, click the Search button to select the wage code associated with the work entry.
In the Pay Rate field, enter the hourly or unit rate for the entry.
In the General Ledger Account field, click the Find button to search for and select the expense account to create the debit for the wages.
In the Tax State field, click the Search button to select the state where the wages are earned.
In the Unemployment State field, click the Search button to select the state where the unemployment taxes are paid for the wages.
In the Workers Comp Code field, click the Find button to search for and select the workers compensation code.
In the Nonfinancial GL Account # field, click the Find button to search for and select the appropriate general ledger account number to have hours worked for this wage code written to.
The Active check box defaults to checked, indicating that the wage record is active. Uncheck the box to make the wage record inactive.
Click Save to save the single wage entry and close the window, or click Cancel to close the Add Single Wage window without saving. Saved wage records are displayed in the grid on the Wages tab.
The Edit button allows you to edit the wage record field values or to change the active/inactive status of a wage record.
On the Wages tab, select the record that you want to edit.
Click Edit. The Edit Single Wage window is displayed.
Edit the fields as needed; refer to the field descriptions from To add a single wage record (above).
Click Save to save your changes and close the window, or click Cancel to exit without saving.
Follow the instructions below to remove a wage record from the employee record if it is not in use. NOTE: You can also choose to deactivate the wage record, rather than delete it, by unchecking the Active box in the edit screen.
On the Wages tab, select the wage record that you want to remove.
Click Remove. A verification message is displayed.
Click Yes to delete the record, or click No to keep it.
On the Wages tab, click the Preview button (located to the left of the Print button) to view the Employee Wage Details report in the Report Viewer, or click Print to print the report to the designated printer. See To preview the report for more information on options within the viewer.