Data Entry
Use the links below to jump to the desired subject:
Tips for navigating
To make a selection from a drop-down list
To use the calendar to select a date
To search using the Find (binoculars) button
To search using the Search (magnifying glass) button
Tips for navigating in the window
These tips will help you to navigate quickly throughout the application, providing you with important information about entering data in the fields.
|
Using keystrokes or the mouse
|
Use the mouse or the keyboard to move through the fields.
-
To move to the next available field using the keyboard, press <Tab>. To go backwards through the fields, press <Shift> + <Tab>.
-
To activate a highlighted button (e.g., calendar button or clock button), press <Enter> when the button is highlighted.
-
To activate a drop-down list for a field, press <F4> when that field is active.
-
To go directly to any field using the mouse, click in the desired field.
|
|
Required fields
|
Required fields are displayed in blue text. You will not be allowed to save the screen until all required fields are completed.
|
|
Drop-down lists ( ) )
|
Fields with an available drop-down list appear with a down arrow button. Click the button to make a selection from a list of valid options. Keep in mind that the options within a drop-down can be interdependent on selections made in previous fields. See To make a selection from a drop-down list for additional information.
|
|
Date fields
|
Click the down arrow button next to a Date field to use the calendar feature. The calendar opens to today's date. If you click on the month or year, a window of additional months (or years) is displayed. See Using the calendar to select a date for additional information.
|
|
Dashes in numbers & codes
|
When entering phone numbers, Social Security numbers, dates, times, and ZIP codes, there is no need to enter dashes or slashes; the system will automatically format the numbers for you.
|
|
Find (Binoculars) 
|
Fields with a search functionality contain a binoculars icon or a magnifying glass icon. The Find (binoculars) button opens an inquiry dialog box for you to enter search criteria. See To search for field values using the Find button for additional information.
|
|
Search (Magnifying Glass) 
|
The Search button opens a separate window of available field values. See To search for field values using the Search button for additional information.
|
To make a selection from a drop-down list
-
Click the field's down arrow button (). A list of available options is displayed.
-
Select the desired option. The drop-down list closes and the field populates with the selected option.
Tip: To cycle through the selections in a drop-down list without using the mouse, press the up and down arrow keys on your keyboard. Then, press <Enter> to select the current option.
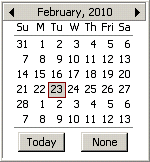
To use the calendar to select a date
-
Click the down arrow button next to a Date field to display the drop-down calendar.
-
If needed, click on the right and left arrows to move forward or back in one month increments. Click on the month or year to display a drop-down of additional months or years for selection.
-
To select the date, click the desired date, or click the Today button to select today's date. You are returned to the field and the selected date is displayed. You can click None to exit the calendar without selecting a date.
If you choose to manually enter dates without using the calendar button, they should be entered in MMDDYY format. Left and right arrow keys can be used to move within the Date field.
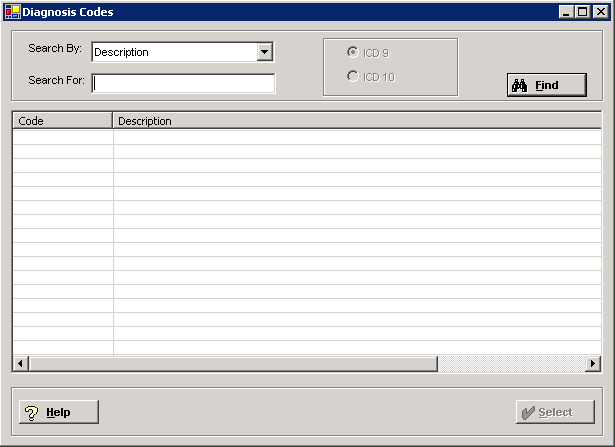
To search for field values using the Find button
If there's a Find button next to a field, follow the instructions below to search for and select a field value. For example:

-
Click the Find button (). An inquiry window similar to the one shown below is displayed. Note: An inquiry window generally contains the Search By and Search For fields; however, certain screens may contain additional fields to further filter the information.
-
In the Search By field, click the drop-down arrow to select an available option.
-
In the Search For field, enter the specific text you want the system to search for, or leave it blank to include all items in the search results.
-
Click Find. A list matching the search criteria is displayed.
-
Use the scroll bar or the up and down arrow keys to locate the item. Click any column heading to sort the list based on that column. Click the column heading again to reverse the order (i.e., ascending or descending).
-
Click to highlight the item (if using the scroll bar). If you use the arrow keys, the items are highlighted automatically as you move through the list.
-
Click Select (or double-click on the desired item). The inquiry window closes and the field is populated with the selected option.
NOTE: In some cases, and if you have user permissions, the bottom of the inquiry window includes buttons to add, edit, or delete items (see below), which updates the appropriate master file.

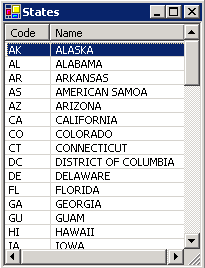
To search for field values using the Search button
If there's a Search button next to a field, follow the instructions below to select a field value. For example:

-
Click the Search button () to display the selection list.
-
Use the scroll bars (if present) or the up/down arrow keys to locate the item.
-
Click to highlight the item (if using the scroll bar). If you use the arrow keys, items are highlighted automatically as you move through the list.
-
Double-click to select and insert the item into the field.
Introduction to Application Help
Introduction to Centriq Software
Common Tasks
Keyboard Shortcuts
Reporting/Printing Functions