The Create ACA Work File window allows you to create a working file of 1095/1094 forms to be reviewed and edited by your facility and then filed with the IRS for the tax year being prepared.
The following tasks must be completed prior to creating the 1095/1094 work file:
Affordable Care Act Parameter (Human Resources > Master Files > Affordable Care Act Parameters) is set the applicable tax year.
ACA Transmission Information contains your facility's transmission information applicable for the tax year being prepared.
Benefit enrollments are established.
Hours detail is populated (Admin > ACA - Merge Hours Detail).
The 1095/1094 work file is generated in either the 1095/1094-C version or the 1095/1094-B version based on your facility's benefit and corporate structure. The data in the file is controlled by ACA Parameter settings (in Human Resources > Master Files > Affordable Care Act Parameters) for the applicable tax year and the employee enrollment information entered during the year.
ACA Parameter Settings |
1095/1094 Form/Record Created |
Notes |
Self Insured Employer = Y Applicable Large Employer (ALE) = N |
1095-B (employee) 1094-B (employer) |
1095-B is created for each employee with coverage of a month during the year with supporting 1095 dependent records. 1094-B is a summarization record. |
Self Insured Employer = Y Applicable Large Employer (ALE) = Y |
1095-C parts 1, 2, and 3 (employee) 1094-C (employer) |
1095-C is created for each ACA full-time employee and each employee offered coverage with supporting 1095 dependent records. 1094-C is a summarization record. |
Self Insured Employer = N Applicable Large Employer (ALE) = Y |
1095-C parts 1 and 2 (employee) 1094-C (employer) |
1095-C is created for each ACA full-time employee and each employee offered coverage. 1094-C is a summarization record. |
The 1095-C file is generated with the appropriate Offer of Coverage and Safe Harbor codes based on the Self-Insured status, and the employee’s Measurement Method (Known Status, Month to Month, or Look Back) and ACA Status (F-Full-time, P-Part-time, S-Seasonal, or V-Variable) as selected on the employee's enrollments. The Coverage Start and End date range determines the coverage period for all measurement methods. The following criteria is used:
If Self Insured = N and the employee has an enrollment record with ACA Status = FT, Offer of Coverage and Safe Harbor codes used in the enrollment is reported.
If Self Insured = Y and the employee has an enrollment record, Offer of Coverage and Safe Harbor codes used in the enrollment for the covered months are reported regardless of the ACA Status. NOTE: If an employee waived coverage and an enrollment is used to track this activity, uncheck the Part III check box on the 1095 for these employees (when the employer is Self-Insured = Y).
If an employee has two or more enrollment records with differing ACA Status (e.g., PT and FT), Offer of Coverage and Safe Harbor codes used in all of his/her enrollment records are reported.
If an employee has an enrollment record in some months, but no enrollment in other months, Offer code 1H is used and Safe Harbor is blank in the vacant months.
In the event of overlapping enrollments, the Look Back method has precedence over the Known Status and Month to Month methods, and full-time status has precedence over part-time status when populating the Offer of Coverage and Safe Harbor codes.
Offer code precedence: 1A, then 1E, then alphabetical 1B, 1C, 1D, 1F, 1G, 1H. (1H can be overwritten by any other offer code.)
The 1094-C file is generated with an accurate count of full-time employees based on the employee’s Measurement Method (Known Status, Month to Month, or Look Back) and ACA Status (F-Full-time, P-Part-time, S-Seasonal, or V-Variable) as selected on the employee’s enrollments. The following criteria is used:
If measurement method = Look Back or Known Status and the ACA enrollment status is full-time, the employee is counted for the enrollment month.
If measurement method = Month to Month, the full-time status is based on ACA hours worked for the month.
Employees employed during an initial assessment period are not counted (i.e., the first three full calendar months after an employee’s hire or re-hire date).
If the employee has two enrollments for the same month, the full-time status has priority for the full-time count.
If the employee does not have an enrollment, the ACA hours worked by the employee is used to determine the full-time status.
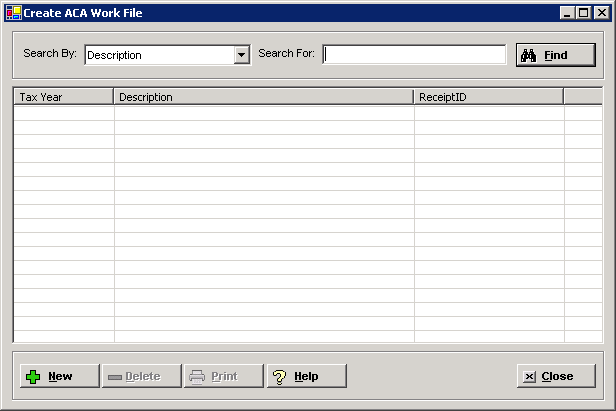
To access the Create ACA Work File window, go to Payroll > ACA Processing > Create ACA Work File. [+]
The following tasks can be performed from this window:
To display all existing work files, click Find without entering any search criteria. The grid displays the work files by Description in alphabetical order. You can click any column heading to sort the list based on that column. Click the column heading again to reverse the order (i.e., ascending or descending).
Change or narrow your search results by entering specific search criteria:
In the Search By field, use the drop-down list to select how you want to search the list and sort the results. Select from the following sort options: Description or Tax Year.
In the Search For field, enter the specific term to search for based on the Search By field choice. Enter all or part of the term to retrieve all records that match the criteria.
Click Find to display the search results in the grid.
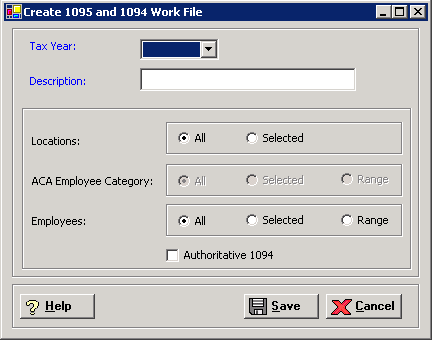
Click New at the bottom of the Create ACA Work File window. The Create 1095 and 1094 Work File window is displayed. [+]
In the Tax Year field, use the drop-down list to select the year for the work file. Only the years that are defined in the ACA Parameter master file (in the Human Resources application) are available for selection.
In the Description field, enter a description (up to 30 characters) of the work file. NOTE: This description is retained throughout ACA processing and with each re-submission. Take into consideration when you name the file that although the contents of the file may change, the name will not change (i.e., don't use verbiage such as "1st Generation" or "Initial File").
In the Locations field, specify the locations to include in the work file. Select All (default) to include all locations, or choose Selected to select specific locations to include.
The ACA Employee Category field is enabled if the ACA Categories master file (in the Human Resources application) has been set up (now or ever). If an employee has more than one category per tax year, select the latest category for the tax year. Select All (default) to include all categories, or choose Selected or Range to select specific categories to include.
In the Employees field, specify the employees to include in the work file. Select All (default) to include all employees, or choose Selected or Range to select specific employees to include.
Check the Authoritative 1094 box if the work file is the employer's authoritative 1094-C. NOTE: Only one 1094-C series is to be authoritative in a given year. This indicates the file is not only a transmittal, but is also the employer's return and contains data necessary to determine the employer's portion due as it relates to Employer Shared Responsibility Payments. The message, Authoritative work file already created for this tax year, is displayed if you attempt to create another authoritative work file.
Click Save to save the work file, or click Cancel to close the window without saving.
Follow the instructions below to delete a file if it has not been submitted or printed as final for employee distribution.
In the Create ACA Work File window, find and select the work file that you want to delete.
Click Delete. A verification message is displayed.
Click Yes to delete the code, or click No to keep it.
If you click Yes to continue with the deletion and the work file has already been transmitted, a message is displayed and the work file cannot be deleted. Click OK to close.
Follow the instructions below to display and/or print a list of 1095/1094 work files.
In the Create ACA Work File window, choose your search criteria and click Find to display the work files that you want to print. All records that are visible in the grid will be included in the report.
Click Print. The report is displayed in the Report Viewer, where you can save the list to the PC/network or print the list to an assigned printer. See To preview the report for more information on options within the viewer.