 CPOE CPOE
The following topics are discussed on this page. Use the links to jump to the desired area:
Computerized Provider Order Entry (CPOE) allows practitioners to enter medication, nursing, and departmental orders from multiple locations using department and physician specific order sets. The orders are then electronically forwarded to the appropriate departmental desktops so they can be processed and charged.
CPOE utilizes the Clinical Decision Support (CDS) system to display the patient's medical history, current results, and evidence-based clinical guidelines to support treatment decisions.
To access CPOE, select the desired patient using the Select button on the Hospital Main page. Then, click the CPOE button. The Order Creation page is displayed and the patient name and visit information are displayed in the yellow bar at the top of the screen. Additional Patient Demographic information, which includes height, weight, BMI, and BSA, is also displayed on the screen below the Physician and Date selection section.
In addition, you may see links to CPOE from other pages within the Hospital module, e.g. Assessments page, Orders Tracking page, and Quick Registration.
TIP: To access additional patient information during Order Entry, access the green Summary and/or Allergy tabs in the upper right corner.
As you select orders, an Alert message may be displayed. These important messages warn you of possible interactions between the orders you are placing or indicate additional required information regarding the order. See the Order Alerts section of this page for more information.
Begin by selecting the Physician, Start Date/Start Time, Source, and Diagnosis. These fields will automatically populate in the order details for the orders you select in step 2:
The Physician field defaults to the logged in user (if a physician or provider). Otherwise, in the Physician field, begin typing the first few letters of the ordering physician. Available matches are displayed. Click to select the desired physician/provider name. When applicable (for verbal and telephone orders), the Supervising Physician field defaults to the assigned supervising physician. (Note: If a physician is entering the order, the Physician field defaults to the current user.)
In the Source field, select the type of order you are entering: Written, Email, Fax, Telephone, Verbal, Signed Order on File, or Protocol. If you select Telephone or Verbal, the Read Back check box is displayed. Check this box to indicate that you read the order back to the practitioner. If you select Signed Order on File, this indicates that you have a physical signed copy of the order and this order is automatically signed and can be completed/processed immediately. If you select Written, providers will need to review the order and sign it electronically in Dr. Signature or the PWC. If you select Signed Order on File, the order is automatically signed and can be completed – it does not require a separate signature process. However, it does require that the order be scanned into the medical record as a document.
The Start Date and Start Time default to the current date/time. If necessary, modify these values by using the calendar and clock buttons.
To attach a diagnosis to the order(s),
click Diagnosis. The Problem
List is displayed listing the patient's existing diagnosis list.
Check the appropriate diagnosis(es) and click Save.
To add a new problem to the list, click the "+"
button.
Then, select the desired order or order set using one of the following methods:
Search
for the order: In the Order
Lookup field, begin typing the first few letters of the
order you are looking for. Matches to the text you type are displayed
in the drop-down list in 4 categories: Orders,
Order Sets, Favorite
Lists, and Home Medication
Formulary. (You may have to scroll down to view each list.)
Note: To add this order to your list of Favorites,
click the Add to Favorites check
box.
Note: This field does not utilize a wildcard search, only the Order Sets look up field utilizes a wildcard search. If you type the % symbol in the Order Lookup field, results are displayed that actually have the "%" symbol in the description.
Click on the desired item to select it. Click the desired item to select it. You may see the following identifiers appended to the order:
[F] - This indicates a formulary medication.
[C] - This indicates that the order is a custom order (hospital-defined) and does NOT come from the standard order catalog.
Use an order set: In the Order Sets field, begin typing the first few letters of the order set. Matches to the typed text are displayed.
You can also use a wildcard search in the Order Sets look up field. The wildcard search is enabled by typing the % symbol in the look up field. This displays the complete list of Order Sets. Note: This wildcard search does not work in the Order Lookup field, only the Order Sets look up field. If you type the % symbol in the Order look up field, results are displayed that actually have the "%" symbol in the description.
Select the desired order set. The Order Set box is displayed listing the orders included in the set in Medication and Department Orders sections. Begin typing the first few letters to go directly to the desired set. Check the appropriate items you wish to create. (You may have to uncheck items that default to "checked" if you wish to exclude them.) To edit the item, click the edit button and make the desired modifications. (TIP: You have the ability to set a default Reason for PRN orders so that you aren't required to enter a reason for every PRN order in the order set. To set this default, go to Clinical Documentation > Master Files > Patient Chart > Order Management > Order Sets.)
|
UpToDate: If you are using the UpToDate functionality (3rd party clinical decision support database), you may see this icon next to an order or order set. This icon indicates that there is evidence and research available in the database to support an action, e.g. order, diagnosis, medication, etc. Click this icon when you see it to launch the UpToDate portal and view the supporting documentation and research. The use of the UpToDate database requires licensing and setup. Contact your Account Manager for details. |
Use the favorite list: For physician order entry, the physician can click Physician Favorites to display their personal favorite list. From this box, check the desired order(s) and click Save. From the favorite box, you can edit and/or remove the item from your list using the appropriate button.
Enter a non-formulary order: To enter a non-formulary medication, click Add Non-Formulary. The Add non-formulary medication box is displayed. Enter the Brand Name, Generic Name, and Dosage. Then, select the appropriate Dosage UOM, Form, and Route using the drop-down lists. Once finished, click Save. (Note: Once saved, this item is added to the Home Medication Formulary and can be used again.)
Important: Non-formulary medications are indicated in the lists by "NF". It is important to note that these non-formulary medications are NOT included in interaction checking!
Enter a future order: To enter a future order, select the order as usual (using the Favorite list, Order Set, Order Lookup, etc.) on the Order Creation page. When the Order Details fly over is displayed, complete the details as required and click the yellow Click for Future Visit button (see below) located in the upper right hand corner of the fly over. The button turns red to indicate that this order is a future order and is being entered at the MPI level. Once you have finished entering the details, click Save Future Order. Future orders are displayed on the Department Orders page.
|
This button is available in the Order Details fly over. Click this button when the order you are entering is for a future visit. |
|
This button is displayed after the yellow button above has been selected. This button indicates to the user that the order you are entering/or has been entered is for a future visit. Future orders can be viewed collectively on the Department Orders page. |
When
Editing Future Orders, some changes require the Provider to sign the order
again. Some edits do not require a Provider Signature following the change:
- In the case where a user clicks ASSIGN SELECTED and
changes the fields below, the user remains as the ASSIGNED and
that order is not sent to the
provider for signature in Provider Signature. The same applies
if a user (non-provider user other than ordering provider) edits a Future
Order, and re-saves to Future Order queue in CPOE we will not send
that order to the provider for signature in Provider Signature:
- Priority
- Start Date/Time
- Special Instructions
- Diagnosis
- Comments
- Source
- Ordering Facility
- Times
- Reason/Indication
- Duration - Stop Date/Time ( for LAB/RAD/OTHER order types)
- In the case where a user clicks ASSIGN
SELECTED and changes
the fields below, the user becomes EDITED and ASSIGNED and that
order is sent to the provider for signature in Provider
Signature as the key components of the order have changed, creating
a new order. The
same applies if a user (non-provider user other than ordering provider) edits a Future
Order, and re-saves to Future Order queue in CPOE we will send
that order to the provider for signature in Provider
Signature as the key
components of the order have changed, creating a new
order. In the scenario of editing a key component of a Future Order
and re-saving to Future Order Queue, the user will have to add a *Reason for
edit.
- Dosage
- Provider
- Dose Range
- IV Rate/Details
- IV Rate Range
- Sig/Frequency
- Additives
- Route
- Duration - Stop Date Time (MED order types)
As you select each order, the Order Details box is displayed. Medication orders will display the following tabs: Order Details, Monograph, Recommendation, and Lab Results. From the Order Details box, you can enter/edit the order details, view lab results, attach a diagnosis(es, view the monograph, and/or view recommendations. For order sets and favorites, you can access the order details to edit them by clicking the edit icon next to the order in the list.
Complete the required fields for each order. Required fields are indicated by an asterisk (*). These fields vary by order, i.e. Pharmacy orders have different required fields from Lab orders or Radiology orders. The following fields are required:
Dosage |
(RX Orders Only) The Dosage usually defaults based on the Formulary Master File. However, modify the Dosage as needed. Note: If required, check the Range box to enter a Dose Range. |
Dose UOM |
This field is not editable. This field contains the UOM that is set up and maintained in Pharmacy > Master Files > Formularies > Dosages > General tab > Dosages section for the selected medication. |
Route |
(RX Orders Only) Use the drop-down list to select the method to deliver the medication, i.e. oral, IV, etc. |
Priority |
Use the drop-down list to select the priority of the order, i.e. ASAP, NOW, Routine, etc. |
Frequency |
Select how often the patient will receive the order item (med, test, treatment) by typing the Frequency Description (i.e. At Bedtime) or the Frequency Code (i.e. HS, BID). After typing, matches are displayed -- select the appropriate frequency from the list of matches. (Note: Frequency Codes are built/maintained in CD > Master Files.) If the selected Frequency (SIG) is set up to allow Days of the Week functionality, the Specify Day of the Week check box is displayed next to the Frequency field. Check this box to display the individual day selection boxes. Check the desired day(s). To enable the Days of the Week functionality, you must identify the desired frequencies (in RX (or Clinical Documentation) > Master Files > Codes > Frequencies) to allow the code to be used with Days of the Week feature. A check box is available on the Add/Edit Frequency window, Allow code to be used with Days of the Week. Check this box so that when the Frequency is selected in Order Entry, the Specify Days of the Week box is displayed during Order Entry. |
Now |
Check this box if the medication order requires a dose now. If additional doses are ordered, the order will then follow the schedule identified in the Frequency and Duration fields. This generates two orders on the Order Tracking page and the eMAR (if appropriate) - the Now dose with the Start Date/Scheduled Time for the current and the order with the remaining schedule/frequency for the ongoing test/administrations documentation. |
Start Date/Time |
Enter the date and time that the order (med, test, treatment) should be started. |
Physician |
Select the physician who is ordering the item (med, test, treatment, etc.)by typing the first few letters of the name. After typing, matches are displayed -- select the appropriate physician from the list of matches. |
Source |
Use the drop-down list to select the source of the order (i.e. Fax, Verbal, Written, etc.). |
Admin Form |
(RX Orders Only) The Admin Form defaults based on the Formulary Master File. |
Strength |
(RX Orders Only) Use the drop-down to select from the available strengths of the medication. |
Stop Date/Time |
Enter the date and time that the order should be stopped. |
Times |
Enter the times of day that the order should be received/performed, i.e. 21:00, 09:00, 1300, etc. -- you can use the colon or type the time without the colon. |
Method |
(IV Orders Only) Use the drop-down list to select the IV method. |
Volume |
(IV Orders Only) Enter the volume of the IV that the patient should receive. |
IV Type |
(IV Orders Only) Use the drop-down list to select the IV type. |
Rate |
(IV Orders Only) Enter the rate that the IV should run for this order. Use the 3 fields to identify the number, the unit, and the time period. For example, to enter the rate as 10 ml/min, you type 10 in the first field, select mL in the second field, and select Min in the third field. Note: If required, check the Range box to enter a Rate Range. |
Complete additional fields as needed (non-required):
Duration |
If the test/medication is to be administered for only a short period of time, indicate this time period using the numerical value field and the drop-down options. |
Reason/Indication |
Type in this field the reason that the medication is being ordered. Click the Diagnosis button to select an item form the patient's problem list. You can also add a new problem to the list from the Problem List box by clicking the [+] button. |
Special Instructions |
Use the drop-down list to select a pre-built instruction item. Or, use the text box to type special instructions for the order. |
Comments |
Use the drop-down list to select a pre-built comment. Or, use the text box to type a comment for the order. |
Use the following buttons/options on the screen to perform additional functions:
Range (under the Dosage field and Rate field): The Range check box appears under the Dosage field and the Rate field (IV meds. Check this box (next to the appropriate field) if the dose (10-30 mg) or rate (100-150 cc/hr) is a range. When checked, an additional field is displayed. Enter the low end of the range in the first field and the high end of the range in the second field, e.g. 10-30.
Dose Calculator: Click this button to launch the Dose Calculator. See Dose Calculator for more information. This button is located next to the Strength field.
Diagnosis:
This button displays the patient problem list. From the Problem List box,
check the desired problems and click Save.
To add a problem, click the ![]() button. For additional
information, see Problem
List.
button. For additional
information, see Problem
List.
Lab Results: To view the patient's current lab results, click the Lab Results tab. Use the Department field and the Panel/Test field to filter/narrow down the results by lab department and/or panel/test.
Sliding Scale: If
required, click the Sliding Scale button
to create a sliding scale. In
the Sliding Scale field, use
the drop-down list to select a pre-built sliding scale. The details of
the scale are displayed in the Start Range,
End Range, Dose,
and UOM columns. Make modifications as necessary
to the values. Click Add More to
add additional ranges. For Actions, use the drop-down list in the
Add Action field to select actions
to attach to the sliding scale. To remove actions, click the ![]() button.
Once finished, click Save.
button.
Once finished, click Save.
Home Medication: Use this check box to indicate that the order (medication) is a home medication.
Use Home Supply: This check box is enabled when the Home Medication check box has been checked. Use this check box to indicate that the patient's own supply of the home medication be used. This information, when selected, is also displayed on the eMAR to the alert the user during administration.
Save and Taper Dose: After entering the details of the order, click this button to save the current details and enter a tapering dose, e.g. 30mg for 3 days, 20 mg for 2 days, and 10 mg for 5 days. The tapering dose window is displayed with the "just-saved" order and a duplicate of the order just beneath it. Click the edit button next to the second order to modify the dose, frequency, times, and duration. Click Save. The Start Date/Time and Stop Date/Time are auto-calculated based on the selected duration. To add an additional tapering dose, click the Add button [+]. Or, to remove one of the doses, click the remove button [-]. Once finished with all of the tapered doses, click OK to return to the Order Creation page. (Note: Each tapered dose will be listed on the Order Creation page as a separate line.)
Additives: (For IV medications only) Click the Add button to display the Additive(s) fly over, type the first few letters of the additive that you are looking for in the text box. Matches to the typed text are displayed so that you can click the desired additive to select it. The additive is displayed in the box. Review and edit, if necessary, the Dose, Volume (ml), and Qty fields. Then, click Save.
Save and Check Necessity: Click this button to save the order and perform medical necessity checking on the item you are ordering and if required, print the ABN (Advance Beneficiary Notice). You may be presented with Pass/Fail questions regarding the procedure. Please respond to the questions, as appropriate. If you choose not to select the answer, the response is recorded as HOLD.
Electronic: This check box identifies if this order was received electronically from the ambulatory provider. This check box is only enabled when your facility checks the E (Electronic) setting in Maintenance > General > MU Reporting > External Lab Order Setup. Check the Electronic check box while placing the lab order in CPOE to mark the order as electronic for the calculations for EH Stage 2 Meaningful Use Menu Set Measure #6: Lab Results to Ambulatory Provider.
After you have completed the order details, click Save. (Or, Save and Taper Dose (see details above).) The order is added to the list of orders by category at the bottom of the screen: Active Orders and Future Orders. (See To assign future orders for additional information regarding future orders.)
To view the patient's current lab results, click Lab Results. The Lab Results box is displayed. Use the Department field and the Panel/Test field to filter/narrow down the results by lab department and/or panel/test.
Repeat steps 1-8 to select additional orders.
OPTIONAL: Each category list allows you to sort, edit, or remove the orders.
To remove orders, check the boxes of the orders you want to remove or check Select All, then click delete selected located in the category header.
To edit order details from a category list, click the pencil icon located to the right of the order. To edit multiple orders for a category, check the boxes of the orders you want to edit or check Select All, then click edit selected in the category header.
To change how the category list is sorted, select Date, Test Description, Priority, Department or Scheduled in the Sort by field.
For Future Orders, you can assign them to the current visit. Check the box next to the order, then click Assign Selected. This will assign the orders to the currently selected visit.
Click Submit Orders. A Submit Orders confirmation message is displayed.
Since some orders are completed and/or administered in the department, you have the option of marking orders complete at the time of order entry.
To skip this process, click Continue when the Submit Orders message is displayed.
To administer/complete one or several of the orders, click Administer Order. The Submit Orders box is displayed.
Check the desired orders that you wish to mark complete/administer. For each order that you check, the Date, Time, Performed by, Route, and a Notes field are displayed.
Review and modify any of the displayed order information for each of the selected orders.
Click Save. You are returned to the Orders Creation page.
Future orders are assigned to a patient at the MPI level. To activate orders, it is important to select the appropriate patient and visit number. Then, go to the CPOE page.
If desired, click the Medical Necessity Checking button to determine the LMRP status. The current status is displayed in the Future Order section in the MNC column.
Locate the desired future order(s) in the Future Orders section in the lower portion of the page and check the box(es) to the left of the desired orders.
Click Assign Selected (located in the gray bar). The Assign Selected Future Order(s) confirmation message is displayed. Click OK to continue. The order is displayed in the active order section.
Review the order, make edits, as appropriate, using the Edit Order and/or Remove Order buttons.
Click Submit to process the order.
When a patient is transferred from one location to another and a new visit is generated, it may be necessary to transfer orders from one visit to another. To transfer orders, click Transfer Orders to display the Order Transfer window.
In the Visit field, use the drop-down list to select one of the patient's visits. The orders for the selected visit are displayed in the box. (Note: Orders that were On Hold from the previous visit are noted with an orange circle icon.)
Check the desired orders for transfer. To edit the order, click the edit button. See To edit order details for additional information.
Click Copy. If required, the order detail window is displayed. Modify the order as needed.
Click Save. The orders are displayed on the Order Creation page.
Follow steps 6-9 of To create orders to complete the order process.
When transferring orders, the Start Date and Time default to the time of the transfer. However, the user can manually change it. The Stop Date and Time default to the original order's stop date and time.
CASE 1: Future start dates (from the current date) carry over to be exactly the same stop date.
Current Order:
Start Date - 04/30/2015 00:42Transferred Order:
Start Date - 04/30/2015 00:42CASE 2: Orders that have a start and stop date before the current date will have the current start date and time and add on the original duration days for the stop date.
Current Order:
Start Date - 04/17/2015 01:00Transferred Order:
Start Date - 04/29/2015 01:00CASE 3: If the order started before the current date, but transferred before the stop date, the transferred orders start with the current date and carry over the remaining duration days. Stop days will remain the same as what was on the original order.
Current Order:
Start Date - 04/22/2015 14:55Transferred Order:
Start Date - 04/29/2015 14:55CASE 4: For orders based on the amount of doses given that will create the stop date, the Stop date and time are carried over to current date and time for start date.
Current Order:
Start Date - 04/20/2015 01:26Transferred Order:
Start Date - 04/29/2015 04:25When placing orders, the order details box is displayed. This box allows you to customize the order for the patient and includes the following fields:
Dosage |
(Medication Orders only) Displays the ordered dose for the selected medication. |
Dose UOM |
(Medication Orders only) Displays the unit of measure for the dose. |
Dose Calculator |
This button displays the Dose Calculator which allows you to determine the dose based on height, weight, BSA, or IV rate. See Dose Calculator for additional information. |
Route |
(Medication Orders only) Displays the ordered route for the medication. Use the drop-down list to select the desired route. |
Priority |
Indicates the priority of the order. Select the appropriate option from the drop-down list: STAT, ER, Routine, ASAP, or Time Critical. |
Frequency |
Select how often the patient will receive the order item (med, test, treatment) by typing the Frequency Description (i.e. At Bedtime) or the Frequency Code (i.e. HS, BID). After typing, matches are displayed -- select the appropriate frequency from the list of matches. (Note: Frequency Codes are built/maintained in CD > Master Files.) If the selected Frequency (SIG) is set up to allow Days of the Week functionality, the Specify Day of the Week check box is displayed next to the Frequency field. Check this box to display the individual day selection boxes. Check the desired day(s). To enable the Days of the Week functionality, you must identify the desired frequencies (in RX (or Clinical Documentation) > Master Files > Codes > Frequencies) to allow the code to be used with Days of the Week feature. A check box is available on the Add/Edit Frequency window, Allow code to be used with Days of the Week. Check this box so that when the Frequency is selected in Order Entry, the Specify Days of the Week box is displayed during Order Entry. |
Now |
Check this box if the medication order requires a dose now. If additional doses are ordered, the order will then follow the schedule identified in the Frequency and Duration fields. This generates two orders on the Order Tracking page and the eMAR (if appropriate) - the Now dose with the Start Date/Scheduled Time for the current and the order with the remaining schedule/frequency for the ongoing test/administrations documentation. |
Start Date/Time |
Indicates the date and time that this test/medication should be started. |
Duration |
If the test/medication is to be administered for only a short period of time, indicate this time period using the numerical value field and the drop-down options. |
Reason/Indication |
Type in this field the reason that the medication is being ordered. Click the Diagnosis button to select an item form the patient's problem list. You can also add a new problem to the list from the Problem List box by clicking the [+] button. |
Diagnosis |
This button activates the Problem List. You can view and/or edit the diagnosis(es) attached to the order. To attach an order, check the desired boxes and click Save. |
Special Instructions |
Use the drop-down list to select a pre-built instruction item. Or, use the text box to type special instructions for the order. |
Comments |
Use the drop-down list to select a pre-built comment. Or, use the text box to type a comment for the order. |
Physician |
Identify the name of the physician ordering the test/medication by selecting the appropriate physician from the drop-down list. |
Type |
Indicates the type of order, i.e. how the order was received. Select the appropriate option from the drop-down list: Written, Email, Fax, Telephone, Verbal, or Protocol. |
Admin Form |
Select the appropriate form of administration using the drop-down list. |
Strength |
Use the drop-down list to select the appropriate strength of medication to be given. If this field is changed, the defaults for that strength (set up in Pharmacy Master) are also updated on screen. In addition, an on-screen message is displayed next to the Strength field indicating that it has been modified. |
Stop Date/Time |
Indicates the date and time that the order should be completed. When you select a duration, these fields are auto-calculated and displayed. |
Times |
This indicates the time the medication is due to be given. |
Indication |
Type the appropriate indication for the test/medication. |
Questions |
This button activates the question box again (Typically, the question box is displayed prior to the order details box.) You can view and/or edit the responses to the questions. |
To edit existing orders, go to the Orders Tracking page to make these changes.
Certain changes to key components in the order will affect the application in the following ways:
Sometimes during the order selection process, you will be presented with order-related questions. These questions help to aid the appropriate patient-specific information for the receiving department. Sometimes these questions may relate to signing consent forms for procedures, patient education, and transportation method. The description of the test that triggered the question is displayed in the white bar at the top of the question box. Once you've answered the questions, click Save to return to the order details screen. You can return to the Questions box at any time by clicking the Questions button in the order details box.
Orders that were entered with relevant notes/special instructions or prep information are indicated with an alert icon located to the left of the order. An orange icon displays for prep information, and a note pad icon displays for a comment.
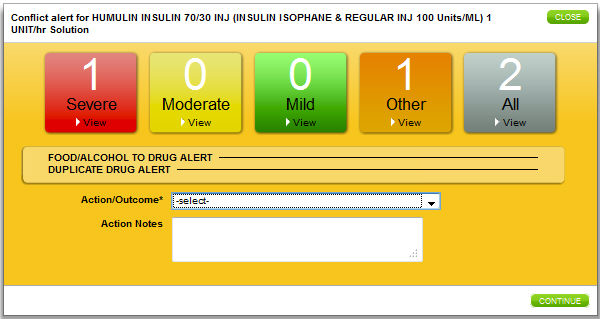
While placing orders, you may receive warnings regarding dosage, duplicate therapy, drug to drug, drug to allergy, and/or drug to food interactions. When these alerts occur, the Alert message is displayed. For each alert, the details, description and an Override Notes field are displayed. You have the ability to continue with the orders or cancel the orders before placing them. When the Conflict Alerts box is displayed, there are 5 colored buttons: Red (Severe), Yellow (Moderate), Green (Mild), Orange (Other), and Gray (All). These buttons display the number indicating the quantity of that severity level alerts. For example, if the red (severe) button displays a number 5, that means that there are 5 severe alerts available for this medication. Click the desired colored button to view the alerts for that severity level. Or, click the Gray (All) button to view all alerts.
When placing orders from CPOE, if you have the conflict checking set to Display During Order Entry (in Clinical Documentation > System Parameters > Order Management), if there is a conflict it will display as a C in the CC column in the Pharmacy application in the Clinical Reviews window. If you have the conflict checking parameter set not to Display During Order Entry and there is a conflict it will display as a P for the CC column in Pharmacy in the Clinical Reviews window. It also displays in Orders Tracking (when the Include inactive orders box is checked) with a pending conflict icon (red triangle). The user will have to address the conflict before they can place the orders.
The use of the Standard Order Catalog (SOC) and Evidence-Based Order Sets (EBOS) requires licensing and setup. Contact your Account Manager for details.
The Standard Order Catalog (SOC) is a collection of standardized orders that includes orders orders, schedules, and dose order forms. This set or orders comes from a standardized database from a Healthland 3rd party partner.
And, the Evidence-Based Order Sets is a collection of standardized order sets (based on evidence in the Clin-eguide database). EBOS are composed of the orders in the SOC. This compilation of order sets comes from a standardized database from a Healthland 3rd party partner.
If you are finished on this screen, there are links to help you navigate quickly to other areas of the Hospital module. Click Orders Tracking (in the lower right corner) or Lab Results (in the lower left corner) to access these areas. Or, click Back to main (in the top right corner) to save the information and return to the Main page. If you wish to return to the Main page without saving, click Back to Main.
Using the Shortcut Tabs: Search, Demographics, Summary, and Allergy |


