The User Defined Fields master file is used to create facility-specific fields, which will display in the Admission and MPI screens during the registration process. This information is used for reporting purposes and may be included on the Admission form.
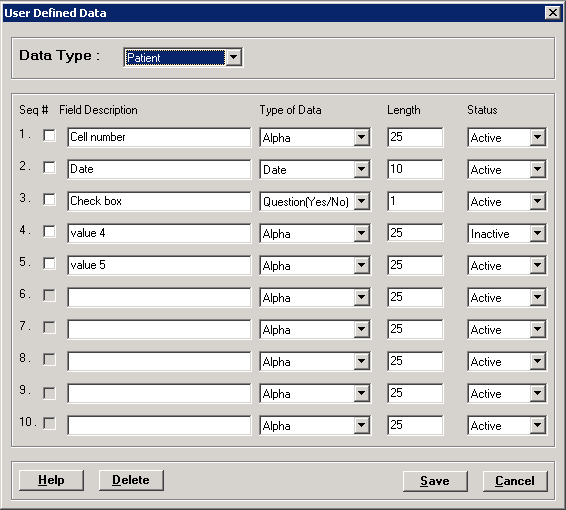
User defined data fields (up to ten (10) fields) can be set up specific to either the patient (MPI) or the visit (episode). A maximum of two inquiry fields can be created having a restricted list of responses.
Response fields can be set up as either free-form Alpha text, Date, or Blank/Yes/No/Unknown.
Once the screen is set up, the User Defined Data button is enabled on the MPI screen (for patient-related questions) and on the Admission screen (for visit and inquiry related questions).
The appropriate user roles in Centriq Administration must
be set up with user permissions to the following secure items for Patient
Registration:
- Admission - UDD
- MPI - UDD
To access the User Defined Data window, go to Patient Registration > Master Files > User Defined Data. [+]
The following tasks can be performed from this window:
In the Data Type field, use the drop-down list to select one of the following data types related to this user defined field:
Patient - To add/edit fields appearing in the User Defined fields in the MPI screen.
Visit - To add/edit fields appearing in the User Defined fields in the Admission screen.
Inquiry - To add/edit fields appearing in the User Defined fields in the Admission screen (which have a restricted list of responses).
Follow the instructions below based on the selected data type:
For Patient and Visit types:
In the Field Description field, enter the text for the user defined field (25 characters maximum).
In the Type of Data field, use the drop-down list to select one of the following options for the type of response:
Alpha (for free form text)
Yes/No
Date
NOTE: The Length field is read-only and indicates the maximum number of characters allowed for the response based on the type of data selected.
The Active check box defaults to checked. Uncheck the box to make the user defined field unavailable/inactive.
Continuing entering fields as needed (up to 10); click Save to save the fields for the selected data type and exit. NOTE: Only one data type can be set up at a time. Clicking Save closes the window. Re-enter the screen to set up fields for a different data type.
Once a user defined field is saved, the data type cannot be changed if corresponding data is entered in the MPI or Admission User Defined Data screen.
For the Inquiry type:
In the first Field Description field, enter the text for the first user defined field (25 characters maximum). If a second inquiry field is needed, enter the appropriate text in the second Field Description field.
The Type of Data field is automatically set to Alpha. NOTE: Set up the possible response codes and descriptions for each of these fields via the Inquiry Code Parameter 1 (for the first field) and the Inquiry Code Parameter 2 (for the second field). During the Admission process, these codes can be entered/inquired upon in the Inquiry section of the Visit User Defined Data screen.
NOTE: The Length field is read-only and indicates the maximum number of characters (25) allowed for the response.
The Active check box defaults to checked. Uncheck the box to make the user defined field unavailable/inactive.
Click Save to save and exit.
Set up the Inquiry Code Parameter 1 (for the first field) and the Inquiry Code Parameter 2 (for the second field) if one exists.
The delete option allows you to remove a user defined data field if it is no longer in use. The field and all associated data that was collected in that field is removed from the patient records.
Select the user defined field(s) that you want to delete by checking the appropriate box under the Seq # column.
Click Delete. A verification message is displayed.
Click Yes to delete the user defined field, or click No to keep it.