Click the Patient Portal button at the bottom of the Add/Edit MPI window. The Patient Portal window is displayed. [+]
The Patient Portal window is used to track your patients' opt in/out status, invitation/registration, and invitation date.
The Patient Portal button is located at the bottom of the Edit MPI for sites using InteliChart users, or the Registration window for sites using MyCareCorner or a state-sponsored patient portal. NOTE: MyCareCorner (once licensed) replaces InteliChart. Click the link below for registration instructions based on your site's configuration:
Click the Patient Portal button at the bottom of the Add/Edit MPI window. The Patient Portal window is displayed. [+]
The following message is displayed upon clicking Patient Portal if the Patient Portal is not currently available: Patient Portal unavailable at this time. Click OK to return to the Add/Edit MPI screen.
In the Portal Status section, one of the following messages is displayed:
Patient has completed the Patient Portal registration process. If this message is displayed, the Generate Portal PIN button is disabled.
Patient has not completed the Patient Portal registration process. If this message is displayed, the Generate Portal PIN button is enabled. The message, Patient chose to opt-out of portal registration on xx/xx/xxxx is displayed if the patient previously opted out of the Patient Portal. Patients can choose to opt in or out at any time.
Not Available - Must retrieve status manually. If this message is displayed, the Retrieve Portal Status button is enabled, and the General Portal PIN button is disabled. This message indicates that the patient portal is set to manual mode vs. auto mode (as set up in the Hospital web application via the Automatically Retrieve the Patient Registration Status option). In manual mode, the patient details are not available until you click Retrieve Portal Status. If the patient has enrolled in the portal, the patient details are displayed. If the patient has not enrolled, the General Portal PIN button is enabled. In auto mode, the patient details are automatically displayed.
The Generate Portal PIN button is enabled only for valid InteliChart users.
The Portal Registration Options section contains the following fields (check boxes), which are automatically populated (checked or unchecked) based on the patient's previous responses during registration. Edit the information as needed.
Patient chooses to opt-out of portal registration or Patient chooses to opt-in and participate in the portal. This check box is displayed based on the patient's previous response.
Patient has been provided with a PIN or registration instructions. If this box is checked, the patient has been given a PIN or registration instructions, and the PIN/Registration Info Date field displays the date and time the PIN/registration instructions were first given to the patient. NOTE: Registration instructions are given when the patient opts out in case they choose to opt in at a later time.
Patient has been provided with the API access passcode or the ability to generate an API access passcode. If this box is checked, the patient was given the passcode to the Patient Portal or granted the ability to create a passcode, and the Passcode Date field displays the date the passcode information was first given to the patient.
The Generate Portal PIN button is available if the patient is not registered with the portal or has chosen to opt out. Click Generate Portal PIN to generate the PIN.
InteliChart returns the generated PIN, and a report is displayed with the PIN information. Click Print to print a hardcopy of the report to give to the patient.
Click Save to save changes to the portal status options.
The following message is displayed if the PIN failed to generate: The portal failed to generate a pin number. Please try again at a later time.
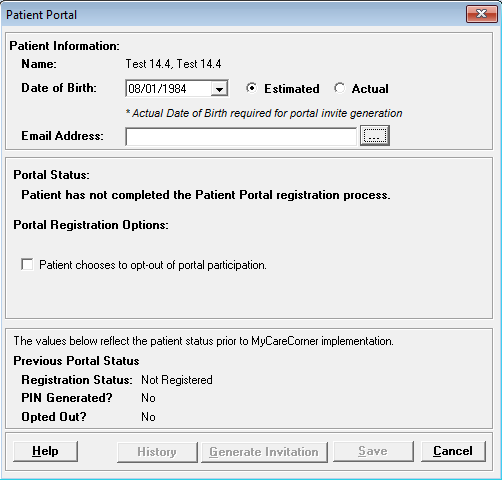
Upon clicking the Patient Portal button at the bottom of the Registration window, or the Save button in the New/Edit MPI screen, the Patient Portal window is displayed. [+]
The Patient Information section displays the patient's name, date of birth, and e-mail address on file.
Date of Birth: If the date of birth is not displayed, you must enter it for portal registration. Actual or Estimated is selected based on the selection in the MPI screen. Actual must be selected to enable the Generate Invitation button. If Estimated is selected, the Generate Invitation button is not available. You can toggle the Actual and Estimated options.
Email Address: To enter or edit the e-mail address, click the ellipsis button to open and complete the E-mail Information window. This field is required when the Email Address field on the Registration > Demographics tab is set as a required entry in the Customized Required Fields master file.
Changes to the Date of Birth and E-mail Address fields will update the patient's master record (People master file) upon clicking Save or Generate Invitation.
If the patient is within the minor age range as set up in the Maintenance application, an informational message, Patient age is within minor age range limit, is displayed in red text at the top of the screen. The following warning message is displayed when a specified minor age range limit is set up incorrectly in the Maintenance application (i.e., is incomplete or invalid): Portal minor age limit configuration is incomplete or invalid. Use the Patient Portal Processing Setup screen within Maintenance - General Maintenance - Patient Portal tab to complete the setup. Click OK and complete the Patient Portal setup in the Maintenance application.
The Portal Status reflects the patient's current portal registration status with MyCareCorner. One of the following messages is displayed:
Patient does not exist on the Portal. Indicates a portal invitation has not been sent.
Patient chose to opt-out of the portal on MM/DD/YYYY.
Patient has not completed the Patient Portal registration process. Indicates a portal invitation has been sent, but the patient has not yet accessed MyCareCorner to complete registration.
Portal Registration Complete. Indicates the patient has accessed MyCareCorner and completed registration.
The system is unable to connect to the portal at this time. NOTE: The Generate Invitation button is disabled when the system is not connected to the portal.
The Portal Registration Options section displays the following information:
Patient chooses to opt-out of portal registration or Patient chooses to opt-in and participate in the portal.
Patient has been provided registration instructions / Registration information provided on: This information displays the date and time the registration instructions were first generated (Generate Invitation button) and given to the patient.
Portal account decouple occurred on MM/DD/CCYY: This information is displayed when the patient is decoupled within MyCareCorner (e.g., when a patient comes within the minor age limit). NOTE: The previous registration information is removed, and the Generate Invitation button is enabled allowing the patient to re-register with the portal.
The Previous Portal Status section is view-only and is updated with the registration status prior to MyCareCorner implementation (Registered or Not Registered), as well as the PIN generation and opt out status (Yes or No).
The Generate Invitation button is available if the patient is not registered with the portal or has chosen to opt out, and the patient's actual date of birth is present. Click Generate Invitation to generate a printable version of the portal registration instructions. If an e-mail address is on file, an invite is sent to the patient. Click the Print button on the invitation screen to print a hard copy of the instructions to give to the patient. Upon clicking Print, the screen is closed and you are returned to the screen from where the portal was launched. The following message is displayed on the Patient Portal screen the first time the invite is generated and sent: Registration instructions first provided on - mm/dd/ccyy. If re-invited, the following message is also displayed: Registration instructions last provided on - mm/dd/ccyy.
The following message is displayed if the generation failed: The portal failed to generate an invitation code. Please try again at a later time.
If an invitation was not generated, click Save to save the changes to the Portal Registration Options (if applicable), and click Cancel to exit the screen.
Upon clicking Generate Invitation or Save, the following message is displayed if the Email Address field value is missing when the email address is set up as a required entry: Demographics Email cannot be empty.
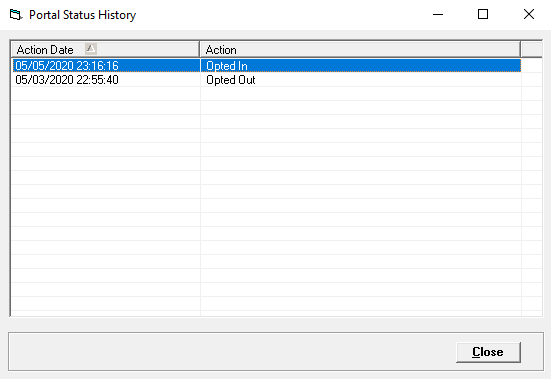
Click the History button to view historical activity associated with the patient's portal status, including when a patient provided registration information, when they registered, when they were decoupled (minors) and re-registered. The History button is enabled only if there is history information available. Information is displayed in chronological order with the most recent activity displayed first, and includes the action date (and time) and the action. Click any column heading to sort the list based on that column. Click the column heading again to reverse the order (i.e., ascending or descending). [+]
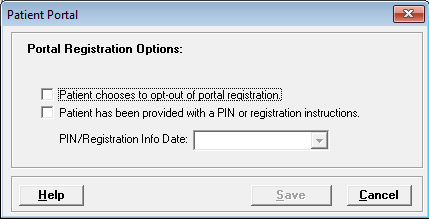
Upon clicking the Patient Portal button at the bottom of the Registration window, or the Save button in the New/Edit MPI screen, the Patient Portal window is displayed. [+]
The Portal Registration Options section provides the following options:
Patient chooses to opt-out of portal registration - Check this box if the patient opted out of the patient portal.
Patient has been provided with a PIN or registration instructions: Check this box if the patient was given a PIN or registration instructions. Manually enter/edit the date as needed in the PIN/Registration Info Date field.
Click Save to save your work and return to the Registration or MPI screen.