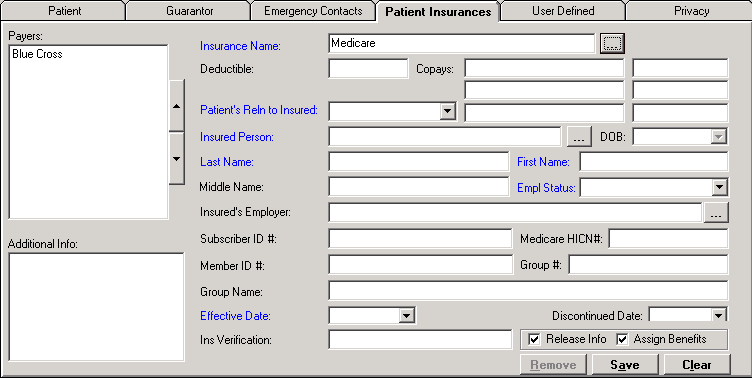
The Patient Insurances tab of the Master Patient Index contains a record of a patient's insurance information. Each patient can have an unlimited number of insurance policies; however, only three insurance codes are allowed per episode.
The patient’s insurance information is recorded during the registration process and sequenced in primary, secondary, and tertiary order. NOTE: An Insurance company may be deleted from the Patient Insurances tab if the insurance is no longer part of an episode, no charges have been posted to it, or if no bills have been created for the specific insurance.
If an insurance company is tied to an episode, the insurance company cannot be deleted, but it can be discontinued and deactivated.
In the Insurance Name field, click the ellipsis search button to access the Insurance Companies window. Search for and select the appropriate insurance company. If the insurance company is not on the list, click New to add the company. See Insurance Companies for detailed instructions. INACTIVE is displayed in red text next to the Insurance Name when the insurance has been made inactive.
In the Deductible field, enter the yearly deductible amount for the patient. (Informational only)
In the Copay fields, enter up to three copay descriptions (left field, e.g., OV for Office Visit) and amounts (right field, e.g., $30.00). Other common copay descriptions are ER and Specialty Clinic. NOTE: Descriptions and amounts entered here will populate the Visit window, enabling registration clerks to collect the appropriate copay for the patient's visit.
In the Patient’s Relationship to the Insured field, use the drop-down list to select the appropriate relationship that the patient has to the insured person. NOTE: If Self is selected, the demographic fields are populated from the patient demographics.
In the Insured Person field, click the ellipsis search button to access the Name (People table) window to search for the person acting as the subscriber. If the person is not found, click New located at the bottom of the Name window to add the insured person to the People table. (See People for detailed instructions.) Once the person has been added, click Save to return to the Name window. Highlight the name in the displayed search results and click Select to populate the person's information in the applicable fields on the Patient Insurances tab, including DOB, Last Name, First Name, and Middle Name. To make the DOB field required, check the Insured DOB box in the Customize Required Fields master file.
If the insured person is deceased, Insured Person is listed as deceased. Do you wish to continue? is displayed when populating the Patient Insurances tab for a new visit. Click Yes to continue, or click No to return to the Insured Person field and edit. NOTE: This message is also displayed when validating the insured person upon saving the MPI or the visit if the user has not yet confirmed the message.
In the Employment Status field, use the drop-down list to select the subscriber's employment status.
In the Insured's Employer field, click the ellipsis search button to open the Employers window and search for the subscriber's employer. If the employer does not exist, click New located at the bottom of the Employers window to add the employer. (See Employers for detailed instructions.) Once the employer has been added, click Save to return to the Employer search window. Highlight the name in the displayed search results and click Select.
In the Subscriber ID# field, enter the subscriber ID number as found on the insurance card. Beginning 4/1/18, this field is used to enter the new Medicare Beneficiary Identifier (MBI).
The Medicare HICN# field is available for the Medicare and Medicare Part B financial class types, and is intended to hold the old Medicare subscriber ID (HICN). The HICN# will default to the value in the Subscriber ID# field, and can be edited as needed.
In the Member ID# field, enter the member ID, if provided, from the insurance card.
In the Group # field, enter a group ID from the insurance card, if provided.
In the Group Name, field, enter a group name, if listed on the insurance card. NOTE: Do not list both a Group # and a Group Name. The claim will be rejected if both are included in the billing file.
In the Effective Date field, use the drop-down calendar to select the date the policy became effective. The date must be less than or equal to the discontinued date. If not, an error message is displayed upon clicking the Save button, and you are required to adjust the effective date.
In the Discontinued Date field, enter the last date the insurance was in effect if the patient no longer has coverage.
To complete an insurance verification, choose from the following options:
If insurance verification was done manually (i.e., phone, website, etc.), enter the date and the initials of the employee who confirmed the insurance in the Ins Verification field.
If a trading partner is set up to send for verification via network connection using the 270 transaction set, click the Check Eligibility button to verify the insurance. (See Insurance Eligibility Verification for detailed instructions.)
Check the Release Info box if the patient authorizes release of his/her information to the insurance company in order to secure reimbursement.
Check the Assign Benefits box if the patient has signed an assignment of benefits allowing the insurance company to send payment directly to the facility.
In the Additional Information box, enter any notes (free text) about the insurance company.
Click Save to save and display the insurance in the Payers box.
To add another insurance company, click Clear and repeat the above steps.
If you edited the effective date
to be after the admit date, the system identifies any episodes where the
insurance applied is no longer valid, and the following warning message
is displayed upon click Save:
Changing the effective
date of this insurance will remove it from the following episodes:
1. Test, Patient 12345-0007 03/05/18
2. Test, Patient 12345-0008 03/14/18
3. Test, Patient 03/28/18
Edit the above episodes and select the correct insurances.
Click OK, and edit the identified
episodes to have the correct insurance.
If you edited the discontinued
date to be prior to the admit date, the system identifies any episodes
where the insurance applied is no longer valid, and the following warning
message is displayed upon clicking Save:
Discontinuing the
insurance will delete it from the following episodes:
1. Test, Patient 56789-0001 03/27/18
Edit the above episodes and select the correct insurances.
Click OK, and edit the identified
episodes to have the correct insurance.
When a patient's insurance information is edited (e.g., demographics, subscriber number, group number), the existing claim is updated only when the Date Printed and Date Transmitted fields are both blank.
If UB and/or 1500 claims exist for the insurance, the Date Printed and Date Transmitted dates must be removed from all claims in order to update each claim with the edited information. NOTE: Depending on the information being edited, an episode may also need to be edited and saved in order to update the claim. The following scenarios illustrate how claims are updated when insurance changes:
Scenario 1: An episode admitted as BCBS is later discovered to be Medicaid instead. The claim already has a printed or transmitted date. Add the Medicaid information to the patient's MPI, and edit the episode by changing the primary insurance to Medicaid (and removing BCBS). The system will display a message asking if you want to remove the printe and/or transmitted dates in order to refile the episode with Medicaid. Click Yes to remove the dates and update the claim or click No to leave the claim unchanged.
Scenario 2: Same as scenario 1, but the claim has never been sent to the insurance company, so there is no printed or transmitted date. Add Medicaid to the patient's MPI, edit the Visit window by changing the primary payer to Medicaid (and removing BCBS), save, and the system will update the claim.
Scenario 3: The insurance was correct (Medicaid) but the ID # was incorrect. Edit the MPI insurance information (i.e., update the ID number, or subscriber name, etc.) and save. If the claim has a printed or transmitted date, the date(s) must be removed (left blank) on each affected claim and the episode must be edited. A second option to fixing Scenario 3 is to edit the incorrect information (i.e., ID number, subscriber name, etc.) directly on the claim form. NOTE: While this scenario applies to much of the information on the claim form, editing the claim form will not correct the patient’s information in the patient's MPI.
REMEMBER: The only time the UB/1500 are updated from registration is when the episode (Visit window) is saved, not when the MPI information is saved.
The up and down arrows next to the Payers box allow the insurance companies to be sequenced as primary, secondary, tertiary, etc. The insurance company at the top is the first insurance company showing in the Visit window. To change the order, select the payer and use the up arrow to move the payer up the list, or use the down arrow to move the payer down the list. Click Save to save changes.
If an insurance company has not been used on an episode, it can be removed from the list. Select the insurance company in the Payers list and click Remove. Click Save to save changes.