Insurance Eligibility Verification
Insurance Eligibility Verification is the process of verifying a patient’s
insurance eligibility for health care services, as well as determining
the patient’s co-pay and remaining deductible before services are rendered.
verifying insurance eligibility and coverage helps the facility communicate
financial expectations to the patient, ultimately minimizing the risk
of uncollected balances.
Verification of insurance eligibility can be done during the admission
process, or it can be done outside of the admission process for single
patient scenarios. The application received results and retains the details
of the verification request.
The 270 and 271 transaction records refer to the information that is
sent and received.
Assumptions
Below is the required system configuration in order to utilize Eligibility
Verification:
Centriq Financial applications in use.
High-speed internet connection.
270 Trading Partner: The 270 transmission type
in Insurance Processing > Trading
Partners > 270 Info tab must be set to the correct format
(5010 version).
Verify that your facility's NPI is entered in
Patient Registration > Master
Files > Facilities.
Insurance carriers are set up with the correct
Eligibility Verification information in Patient
Registration > Master Files > Insurance Companies > Eligibility
Info tab.
User roles are allowed access to MPI Check Eligibility
in Centriq Administration.
See
the Centriq Third Party Products
Setup Guide located
on CPSIQ for step-by-step instructions on how to set up Eligibility Verification.
Certification Process
Currently, all facilities, such as hospital, Long Term Care, and Home
Health, require only a single registration with Emdeon or Rycan. NOTE:
Emdeon is used for the v5010 format only.
Contact Us
Contact Centriq support for an official list of payers. Contact your
Account Manager for more information.
To check insurance eligibility
In the Registration window, search for and select the patient
and click the Edit MPI button.
The Edit Master Patient Index window is displayed.
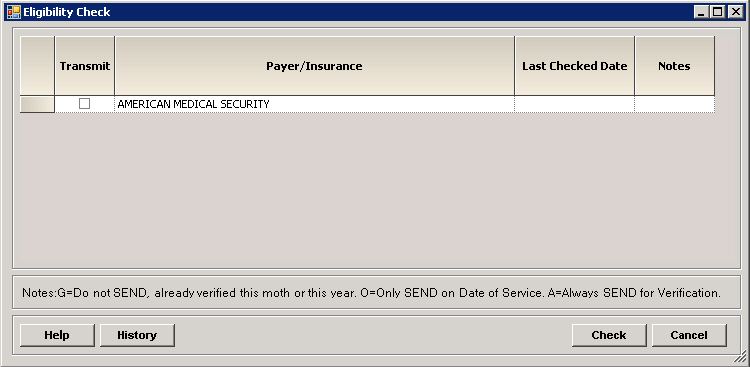
Click the Check Eligibility
button at the bottom of the window. The Eligibility Check window is
displayed with a list of all insurance(s) carried by the patient.
[+]
See below for a description of each column in the grid:
Transmit
- This check box is used to select the payers to include in the
eligibility verification. (NOTE: Only those payers set up as eligible
for Emdeon checking can be selected.) The Transmit
box is selected by default based on the Active
(Yes) and Eligibility Checking
Frequency as set up in Master
Files > Insurance Companies > Eligibility Setup tab.
Frequency setup affects verification checking in these ways:
Check
Date of Service - Checks if the system date = service
date
Good
for the Month - Checks if the system date's month is
not within the same calendar month as the date the insurance
was last checked.
Good
for the Year - Checks if the system date's year is
not within the same calendar year as the date the insurance
was last checked.
Always
Check - Always checks independent of the last date insurance
was checked.
Payer/Insurance
- Insurance as entered on the
Patient Insurance tab of the Add/Edit MPI window.
Last Checked
Date - Displays the last date that the insurance was verified.
Notes
- Displays a verification code to indicate whether or not the
payer needs verification (based on the legend located at the bottom
of the screen).
G=Do
not SEND, already verified this month or year
O=Only
SEND on Date of Service
A=Always
SEND for Verification
The Subscriber
ID # and Group # must be
entered on the Patient Insurance
tab. If not entered, a message is displayed (after clicking the Check Eligibility button) stating
there isn't enough information to check eligibility.
Indicate the payers for verification by checking or unchecking
the Transmit box for each
insurance.
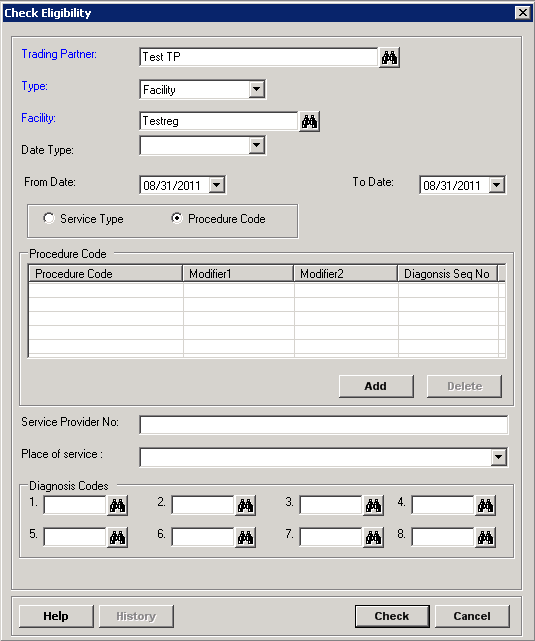
Click the Check button
at the bottom of the window. The Check Eligibility window is displayed.
[+]
In the Trading Partner
field, click the Find button
to access the Trading Partners inquiry screen and select the trading
partner for checking eligibility. (NOTE: Trading partner is set up
for the 5010 format.)
In the Type field,
select whether verifying a Facility
or a Physician.
If verifying a physician, the Physician
Type field is displayed. Use the drop-down list to select the
physician's type:
If verifying a facility, the Facility
field is displayed. The default facility is displayed if set up
in the Trading Partner master file (in Insurance Processing). ALWAYS verify the correct facility
is displayed before proceeding with the eligibility check.
To edit, click the Find
button to access the Facilities inquiry screen and select the appropriate
facility.
In the Date
Type field, select Issue
or Plan. NOTE: This field
is required in order to transmit service dates.
In the From
Date and To Date fields,
specify the time frame (service date range) you want to include in
the verification.
Select Service
Type or Procedure Code
based on the criteria to include in the insurance verification. NOTE:
The Procedure Code option is not available for Rycan eligibility verification.
Choose from the following options:
If Service
Type is selected, the Service
Type panel is displayed. Check the boxes of the service
types to include in the insurance verification, or check the Select All box to include
all service types. The Select
All box is disabled when over 99 service types are displayed
(see note below).
There are 180+ service types
available for selection. To save time during the verification process,
the 270 Service Types tab in Insurance Processing > Master Files
> Trading Partners can be used to select the service types that
are most commonly used by your facility to appear in the Service
Type panel for potential verification, and indicate whether or
not to default them as selected for verification. You can toggle (check/uncheck)
the service type check box settings in the Service
Type panel as needed.
Up to 99 service types are allowed to pass in the 270 transaction set.
If over 99 service types are selected, the message, Maximum
number of selected service type exceeds the limit of 99, is displayed
upon clicking the Check button.
Click OK and adjust the Service
Type selections to be 99 or less.
In the Procedure Code
field, click the Find
button to search for and select the procedure code to include
in the insurance verification.
In the Modifier 1
and Modifier 2 fields,
click the Find button
to search for and select the appropriate modifiers for the
procedure code.
In the Diagnosis Seq
# field, enter the numerical sequence.
Click Save.
(Repeat steps A-D for each procedure code to include in the
insurance verification.)
In the Service
Provider No. field, enter the service provider number (up to
20 characters).
In the Place
of Service field, use the drop-down list to select the place
of service.
In the Diagnosis
Codes fields, click the Find
button to access the Diagnosis Code inquiry window. Search for and
select a diagnosis code to include in the insurance verification.
Up to 8 codes can be entered.
When selecting an ICD-10 diagnosis code, the following
data elements are validated against the episode's diagnosis; one of the
following warning messages will display if the selected diagnosis doesn't
match the episode data.
Data Element |
Warming Message |
Gender |
Gender
of Diagnosis Codes does not match gender of patient. |
Newborn |
Newborn
Diagnosis Code for patient over one year old. |
Age |
Patient
age is less than Diagnosis Code minimum age - min age. |
Age |
Patient
age is greater than Diagnosis Code maximum age - max age. |
Click Check.
The 270 transaction set is generated and sent to the trading partner
(e.g., Emdeon) for verification. The Eligibility Details window is
displayed. [+]
Select the following options as needed:
Click the Details
button to display the Eligibility Information. Click on the appropriate
tab to view the corresponding information.
The Eligibility
Information tab displays the eligibility data from
the 271 file. NOTE: Any errors (code and description)
from the 271 are displayed here along with the follow-up action
code and description.
The 270
Request tab displays the formatted data transmitted
in the 270.
The 271
Response tab displays the formatted data transmitted
in the 271.
Click the Print
270/271 button to view and/or print the 270 request and
271 responses in report format.
Click the Print
Eligibility button to print the eligibility request.
Click OK to continue.
If more than one insurance was selected, the transmission process
continues with each insurance until all selected transmissions are
completed. Once the last transmission is completed, you are returned
to the Eligibility Check grid. The Last Checked Date and Notes information
is updated in the grid, and the History window is updated with the
last checked date.
Click Cancel to exit
the Eligibility Check window and return to the Edit Master Patient
Index window.
To view transaction history
On the Eligibility Check window, click the History
button. The Eligibility Check History screen is displayed.
A list of transactions is displayed in a grid with the most
current transaction listed at the bottom. The grid includes the insurance,
trading partner, facility, physician, and last checked date. Select
a line item to view.
Click View Eligibility Details.
The Eligibility Details window is displayed as described above.