The Insurance Companies master file allows you to maintain a list of insurance companies to which the facility sends bills. Each insurance company must have a financial class selected (e.g., Commercial Insurance, Blue Cross, Medicare).
An insurance company cannot be deleted if it is used in a patient account.
Setup considerations: When adding a insurance company to the Insurance Companies master file, also determine whether the new insurance company requires setup in other Centriq master files. Click here to view a list >> [+]
To access the Insurance Companies window, go to Patient Registration > Master Files > Insurance Companies. [+]
The following tasks can be performed from this window:
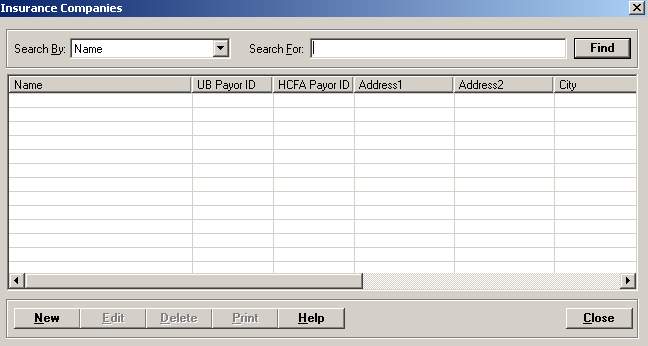
To display all insurance companies on file, click Find without entering any search criteria. The grid displays the insurance companies by Name in alphabetical order. You can click any column heading to sort the list based on that column. Click the column heading again to reverse the order (i.e., ascending or descending).
Change or narrow your search results by entering specific search criteria:
In the Search By field, use the drop-down list to select how you want to search the list and sort the results. Select from the following sort options: Name, Name in Form, UB Payor ID, or Phone.
In the Search For field, enter the specific term to search for based on the Search By field choice. Enter all or part of the term to retrieve all records that match the criteria.
Click Find to display the search results in the grid.
Click New at the bottom of the Insurance Companies window. The Add Insurance Company window is displayed. [+]
In the Name field, enter a unique name (up to 60 characters) for the insurance company. This is the field users will see throughout the Centriq applications, (such as the Insurance tab of the MPI, Patient Balance Inquiry).
In the Name in Form field, enter the name of the insurance company (up to 25 characters) as it should appear on the insurance form. This name displays on the UB and 1500 claim forms. NOTE: This value does not need to be unique.
In the UB Payor ID field, enter the Electronic Payer Identification number (NEIC) for the UB (Institutional) claims. NOTE: Your facility may elect to create a standard UB Payer ID for use with hardcopy billed claims, e.g., Workers Compensation or Auto Insurance companies. The UB Payor ID value is also used in Insurance Processing > Master Files > Cross Over Table.
In the 1500 Payor ID field, enter the Electronic Payer Identification number (NEIC) for the 1500 (Professional) claims. NOTE: This is usually the same as the UB Payor ID, but may be different, depending on individual insurance companies.
In the Eligibility Payor ID field, enter the vendor's unique eligibility verification payer ID (up to 11 digits). This is required when using Eligibility Verification. This information is included in the 270 transaction (in NM109 2100A).
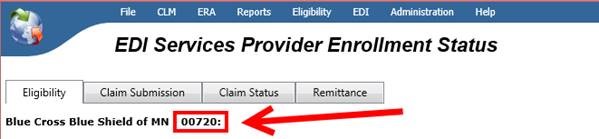
The payer ID can be obtained in TruBridge RCM at EDI > Payer List. Find the payer in the list, and select it. Once you have chosen the payer, ensure you are on the Eligibility tab. The Payer ID will display at the top next to the Payer Name.
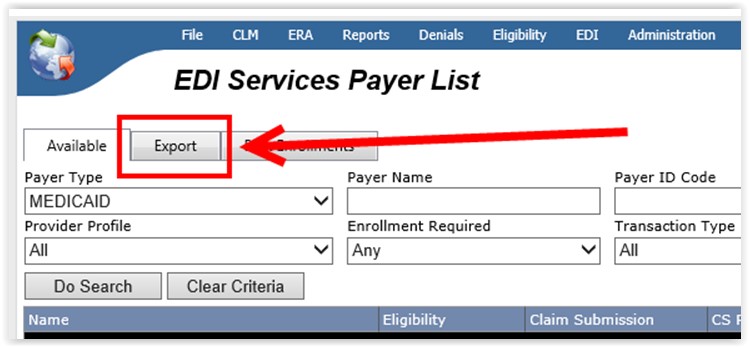
Return to EDI > Payer List (in TruBridge RCM), and select the Export tab to export the payer list.
Enter the Address, Phone, and Fax number of the insurance company in the appropriate fields.
In the Financial Class field, click the Search button to display the Financial Classes search window to select the appropriate financial class. The financial class can be changed at any time and will not update the existing episodes/bills; however, changes made to the financial class will be reflected on new registrations/bills.
In the Pymt Source field, use the drop-down list to select the payment source to populate for the "Expected Source(s) of Payment for this Visit" portion of the Payment Sources section in the CCDA Health Care Survey. Payment sources are listed in the drop-down by level of hierarchy. (This is a Meaningful Use requirement)
The Health Plan ID field, is used by the HL7 interface to populate the data into the IN1 segment for state-specific reporting purposes (i.e., for New Mexico sites for Syndromic Surveillance reporting). Enter the appropriate information as needed per your state requirements.
Check the Override UB 13X Type of Bill with 85X box to override the patient class default 13X (e.g., 131, 132, etc.) type of bill (as set up for the patient class) if this payer requires an 85X (e.g., 851, 852, etc.) type of bill, e.g., Medicaid replacement plans (Wyoming and Nebraska Medicaid payers), Tricare.
For Medicare, the 85X TOB is always used when the Critical Access Facility option is selected in Patient Registration System Parameters, (except when the patient class is created as an Outside Lab), and is not based on the Override UB 13X Type of Bill with 85X option (above).
Check the Print DRG on UB box to print the DRG code, as coded in HIM, on the UB form in FL 71. Defaults to unchecked.
Check the Exclude Middle Initial box to exclude the patient's middle initial from the eligibility verification 270 transaction (in Subscriber NM105 2100C and Dependent NM105 2100D).
In the Part A LCD field, use the drop-down list to select the default Part A Local Coverage Determination (LCD) payer code to use for Medical Necessity Checking. The value selected overrides the Part A LCD value in the Facilities master file when this insurance is assigned as the patient's primary insurance.
In the Part B LCD field, use the drop-down list to select the default Part B LCD payer code to use for Medical Necessity Checking. The value selected overrides the Part B LCD value in the Facilities master file when this insurance is assigned as the patient's primary insurance.
Part A LCD and Part B LCD codes are pre-defined codes as supplied by 3M (the MNC vendor). These values should be entered in the rare scenario when an insurance company communicates that they follow LCD policies for a different state. For example, a facility in MN typically follows MN LCD policies. However, if insurance XYZ indicates they follow TX policies, then enter the TX LCD setting for that insurance company.
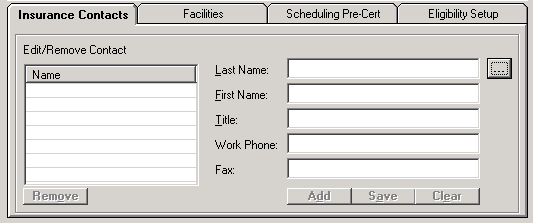
Select the Insurance Contacts tab to manage insurance company contact information. While setup is optional, this information can be selected when adding treatment authorizations on the episode's visit (in the Add/Edit Admission screen). [+]
To add a contact, follow the instructions below:
In the Last Name field, click the ellipsis button to select the contact. The Name selection window is displayed. Enter search criteria and click Find to locate the contact's name in the People table. (If the name does not exist, click New in the Name window to add the contact to the People master file.) Highlight the contact in the Name selection window and click Select to display the name in the Insurance Contacts tab.
Enter the contact's title, work phone, and fax number respectively in the Title, Work Phone, and Fax fields.
Click Add to add the contact to the Edit/Remove Contact list.
To edit a contact, highlight the contact in the Edit/Remove list. The information is displayed in the fields provided; edit as needed and click Save.
To remove a contact, highlight the contact in the Edit/Remove list and click Remove.
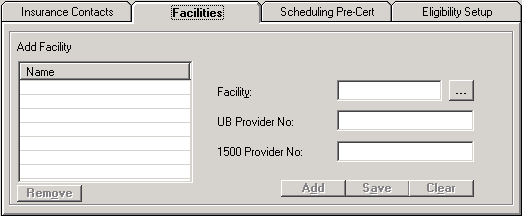
Select the Facilities tab to manage facility information, such as the Facility name, UB Provider number, and 1500 Provider number for facilities accepting this insurance provider. This tab is used if you have multiple facilities (e.g., outpatient clinics, surgical centers) with different UB and 1500 provider numbers than the primary facility. [+]
To add a facility, follow the instructions below:
In the Facility field, click the ellipsis button to select the facility. The Facilities selection window is displayed. Enter search criteria and click Find to locate the facility. (If the facility does not exist, click New in the selection window to add the facility to the Facilities master file.) Highlight the facility in the selection window and click Select to display the facility in the Facilities tab.
Enter the facility's UB and 1500 provider numbers respectively in the UB Provider No and 1500 Provider No fields.
Click Add to add the facility to the Add Facility list.
To edit a facility, highlight the facility in the Add Facility list. The information is displayed in the fields provided; edit as needed and click Save.
To remove a facility, highlight the facility in the Add Facility list and click Remove.
(Optional) Select the Scheduling Pre-Cert tab to manage pre-certification requirements based on service and insurance company. (For example, for Medicaid, all Outpatient CTs and MRIs must have a pre-authorization prior to having services rendered.
In the Scheduling Department field, click the Search button to select the department. The Appointment Types for the selected department are displayed.
In the Category field, click the Search button to select a category to filter the Appointment Types list based on the selected department and category. NOTE: Not all departments have appointment types linked to categories in the Scheduling master files.
In the Appointment Type list (on the left), select the appropriate appointment types and double-click (or click the -> button) to add them to the validation list (on the right). The Effective Date defaults to the current date; edit if needed. To remove an appointment type from the validation list, select it and double-click (or click the <- button). NOTE: To add (move from left to right)multiple appointment types, press and hold the <Ctrl> key, and click on individual appointment types. Once all appointment types are selected, click the -> button to move them all at the same time.
In Scheduling, users' permissions (in Admin > User Access Rights) will determine if a pre-certification must be obtained during the scheduling process. An additional setting is also required in the Scheduling System Parameters in order for the a warning to appear during the scheduling of appointment types for this insurance requiring pre-certification.
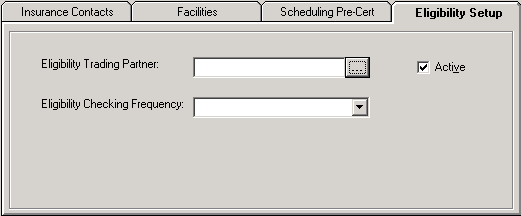
Select the Eligibility Setup tab to assign an eligibility payer to an insurance company. [+]
In the Eligibility Trading Partner field, click the ellipsis button to select the trading partner to be used for eligibility verification as established in the Trading Partners master file of the Insurance Processing application.
Check the Active box if the Insurance Company is an active insurance for eligibility checking.
In the Eligibility Checking Frequency field, use the drop-down list to select one of the following options to indicate how often to check eligibility for this insurance:
Check Date of Service: Used for the insurance companies that will not verify for future dates of service. When those payers are assigned to an episode, the system will only check eligibility for the date of service.
Good for the Month: Used for insurance companies that require verification once a month. Once verified, the verification is good for the entire month. It won't be necessary to perform another eligibility verification for the patient if a successful transmission occurred within that month, however, a re-check of the payer is allowed.
Good for the Year: Used for insurance companies that require verification once a year (e.g., Medicare Replacement Plans). It won't be necessary to perform another eligibility verification if a successful transmission occurred within that calendar year; however, a re-check of the payer is allowed.
Always Check: Used for insurance companies that require checking every time a patient presents to the facility.
The Active check box defaults to checked, indicating that the insurance company is available for use in the Centriq system. Uncheck the box to make the insurance company unavailable/inactive.
Click Save to save the insurance company and close the window, or click Cancel to close the window without saving.
The Edit button allows you to edit the insurance company field values or to change the active/inactive status of an insurance company.
In the Insurance Companies window, find and select the insurance company that you want to edit.
Click Edit. The Edit Insurance Company window is displayed.
Edit the fields as needed; refer to the field descriptions from To create an insurance company (above).
Click Save to save your changes and close the window, or click Cancel to exit without saving.
Follow the instructions below to delete an insurance company from the master file if it is not in use. Note: You can also choose to deactivate the insurance company, rather than delete it, by unchecking the Active box in the edit screen.
In the Insurance Companies window, find and select the insurance company that you want to delete.
Click Delete. A verification message is displayed.
Click Yes to delete the insurance company, or click No to keep it.
Follow the instructions below to display and/or print a list of insurance companies on file.
In the Insurance Companies window, choose your search criteria and click Find to display the insurance companies that you want to print. All records that are visible in the grid will be included in the report.
Click Print. The report is displayed in the Report Viewer where you can save the list to the PC/network or print the list to an assigned printer. See To preview the report for more information on options within the viewer.