The Guarantor tab of the Master Patient Index contains information about the guarantor (responsible party). One guarantor may be responsible for more than one patient’s accounts; a patient is not necessarily his/her own guarantor (e.g., a minor child). Specify an existing guarantor for the patient, add a new guarantor record, or edit existing guarantor information on this tab. [+]
Choose from the following options to specify the guarantor:
In the Guarantor # field, click the ellipsis button to open the Guarantors window. Use the search options to locate and select the correct guarantor file. Once selected, the guarantor information is automatically populated on the Demographics and Additional Info sub-tabs; edit as needed (see To edit guarantor information below). If the guarantor is not found, create a new guarantor (see To add a guarantor file below).
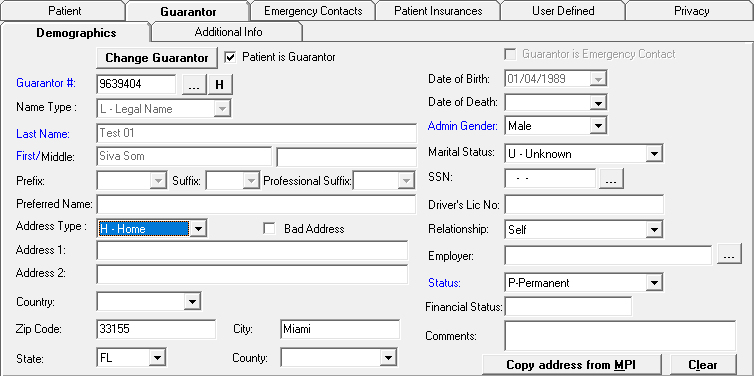
If the patient is his/her own guarantor, check the Patient is Guarantor box. Once selected, the patient's information from the MPI header and Patient tabs is automatically populated on the Guarantor > Demographics and Additional Info tabs.
To change the current guarantor, click the Change Guarantor button above the Guarantor # field to open the Guarantors window and search for the correct guarantor.
To manually edit the guarantor number by backspacing and entering the number directly in the field, you must have user permissions set up in Centriq Administration.
You can edit most of the guarantor's information directly on the guarantor's Demographics and Additional Info sub-tabs (see To add a guarantor file below for field descriptions). However, the Name Type, Last Name, First/Middle, Prefix, Suffix, Professional Suffix, and Date of Birth fields on the Demographics tab are view-only, and can only be changed via the Change Guarantor button. Use the instructions below to change the guarantor's name information and date of birth:
Click Change Guarantor. The Guarantors window is displayed.
In the Search By field, use the drop-down list to select how you want to search the list and sort the results. Select from the following sort options: Name, DOB, or Home Phone.
In the Search For field, enter the specific term to search for based on the Search By field choice. Enter all or part of the term to retrieve all records that match the criteria.
Click Find to display the search results in the grid.
Select the guarantor and click Edit to open the Edit Guarantor window. Refer to the field descriptions in To add a guarantor file (below).
Edit the information as needed and click Save.
The message, Guarantor Number cannot be empty, is displayed if the Guarantor # field is blank. Click OK, and ensure the guarantor number is entered.
Upon saving the MPI, the following message is displayed
if the guarantor is changed on the MPI without changing the guarantor
on the related episodes:
You have changed this
patient's guarantor from [last name, first name] to [last name, first
name]. The following episodes may need to be updated to reflect the new
guarantor:
[list of episodes]
Review the episodes in Patient Registration > Registration > Edit
Visit, and set the correct guarantor as needed.
Click OK, and review the related
episodes.
Once the MPI is saved, the H button next to the Guarantor # field allows you to view the guarantor's demographics history. NOTE: Edits are not allowed in this window. This window is similar to the patient's demographics history. See Demographics History for more information.
Click the Clear button on the Demographics tab to clear the fields on the tab and enter the correct guarantor information (e.g., when information is entered in error, patient is no longer his/her own guarantor). See To specify an existing guarantor on file or To add a guarantor file for instructions on how to enter guarantor information.
Use the following instructions to add a guarantor record when the guarantor is not on file.
On the MPI > Guarantor > Demographics tab, choose from the following options to add a guarantor record:
If the patient is his/her own guarantor, check the Patient is Guarantor box on the guarantor's Demographics tab. The patient's information as entered on the MPI header and Patient tabs is displayed on the guarantor's Demographics and Additional Info tabs. If the Auto Increment box is checked (in the Guarantor section of the System Parameters), the next available number is displayed in the Guarantor # field. If the Auto Increment box is not checked, the Guarantor # field is blank, and must be entered manually. Continue to enter any remaining information directly on the Demographics and Additional Info tabs; refer to the field descriptions from To add a guarantor via the Add Guarantor window (below).
If the guarantor is not the patient, there are two options (below) to add a guarantor file from the Guarantor > Demographics tab. NOTE: Both options provide a way for you to first search for the person's People record. Adding information directly on the Guarantor > Demographics tab to create a guarantor without searching for the person first may cause duplicate People records to be created. It is recommended you perform multiple searches using different criteria (i.e., Name, DOB, Home Phone) to verify one does not already exist.
Use the SSN field search option (ellipsis button) to open the Name window and search for the People record. Upon selecting the People record, many of the fields on the Guarantor > Demographics and Additional Info tabs are automatically filled in. Fill in the remaining information as needed. The guarantor record is created once the MPI is saved (Save button). See To search for a People record below for detailed instructions.
Use the Guarantor # field search option (ellipsis button) to access the Add Guarantor window. See To add a guarantor via the Add Guarantor window.
The Name (People Table) search option allows you to perform multiple searches using different criteria (i.e., by Name, DOB, Home Phone) to verify whether or not a person's People record exists. It also allows you to create the People record if one does not exist.
The Name (People Table) search option is available in the following fields:
The SSN field search (ellipsis button) on the Guarantor > Demographics tab opens the Name window.
The Last Name field search (ellipsis button) within the Add Guarantor window (see To add a guarantor via the Add Guarantor window below) opens the People Table window.
Follow the instructions below to search for the People record from the Name (People Table) window:
In the Search By field, use the drop-down list to select how you want to search the list and sort the results. Select from the following sort options: Name, DOB, or Home Phone.
In the Search For field, enter the specific term to search for based on the Search By field choice. Enter all or part of the term to retrieve all records that match the criteria.
Click Find to display the search results in the grid.
If the person's People record is found, select the name from the grid, and click Select.
From the Name window, you are returned to the Guarantor > Demographics tab with the information from the People record displayed. Continue to enter any remaining information directly on the Demographics and Additional Info tabs; refer to the descriptions from To add a guarantor via the Add Guarantor window (below).
From the People Table window, you are returned to the Add Guarantor window with the information from the People record displayed. Continue to enter any remaining information and click Save to save the guarantor record and you are returned to the Guarantor > Demographics tab. See To add a guarantor via the Add Guarantor window (below).
If the person's People record is not found:
Click New at the bottom of the Name (People Table) window to add the People record. Refer to the People master file for detailed instructions on how to add a People record. NOTE: You can also use the Edit, Delete, and Print buttons, as needed, to edit, delete, or print People records.
Upon saving the People record, you are returned to the Name (People Table) window. Enter your search criteria to search for the newly created People record. The records matching the entered criteria are displayed in the grid. Select the desired record, and click Select.
From the Name window, you are returned to the Guarantor > Demographics tab with the information from the People record displayed. Continue to enter any remaining information directly on the Demographics and Additional Info tabs; refer to the field descriptions from To add a guarantor via the Add Guarantor window (below).
From the People Table window, you are returned to the Add Guarantor window with the information from the People record displayed. Continue to enter any remaining information and click Save to save the guarantor record. The Add Guarantor window is closed and you are returned to the Guarantor > Demographics tab. See To add a guarantor via the Add Guarantor window (below).
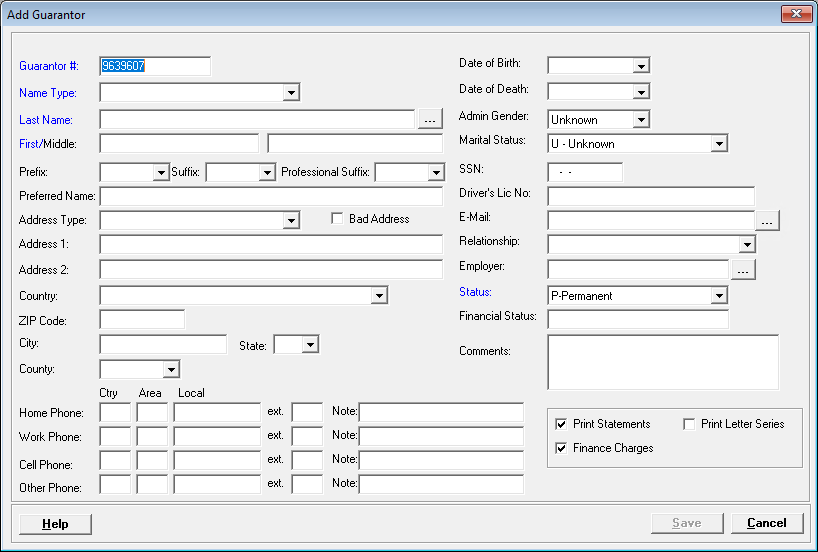
The Add Guarantor window allows you to add a guarantor file if one was not found when searching for the guarantor record via the Guarantor # field.
An option is available within the Add Guarantor window to search for the person's People record in the People Table (via the Last Name field). It is recommended you use the People Table search to make sure the People record does not already exist, and to avoid creating duplicate records.
To access the Add Guarantor window, click the ellipsis button in the Guarantor # field on the Guarantor > Demographics tab. The Guarantors window is displayed. After using the search options and verifying the guarantor record does not exist, click New at the bottom of the Guarantors window. The Add Guarantor window is displayed. [+]
The Guarantor # field displays the next available number if the Auto Increment box is checked (in the Guarantor section of the System Parameters). If the Auto Increment box is not checked, the Guarantor # field is blank, and must be entered manually.
In the Name Type field, use the drop-down list to select one of the following options. This field defaults to L - Legal Name. If a record exists, the Last Name, First Name, Middle Name, Prefix, Suffix, and Professional Suffix field values are automatically populated. If a name type is entered that matches the patient's alternate name, the alternate name information is cleared.
A - Alias
B - Name at Birth
C - Adopted Name
D - Display Name
I - Licensing Name
L - Legal Name
M - Maiden Name
N - Nickname
P - Name of Partner/Spouse
S - coded pseudo-name for Anonymity
T - Indigenous/Tribal/Community Name
U - Unspecified
In the Last Name field, click the ellipsis button to open the People Table window to search for and/or add the person's People record. See To search for a People record for detailed instructions on how to search for and/or add the People record.
In the First/Middle field, enter the guarantor's first name in the first field and their middle name in the adjacent field.
In the Prefix field, use the drop-down list to select the name prefix, if desired (e.g., Dr., Pres., Gov.).
In the Suffix field, use the drop-down list to select the name suffix, if desired (e.g., Jr, Sr, I, II or III).
In the Professional Suffix field, use the drop-down list to select the professional suffix (e.g., PhD, MD, CPA).
In the Preferred Name field, enter the guarantor's preferred name, if desired. (NOTE: This name is also available in some searches.)
In the Address Type field, use the drop-down list to select one of the following options that describe the address. Defaults to H-Home. If an address type is entered that matches the patient's alternate address, the alternate address information is cleared.
B - Firm Business
BA - Bad Address
BDL - Birth Delivery Location (address where birth occurred)
BR - Residence at Birth (home address at time of birth
C - Current or Temporary
F - Country of Origin
H - Home
L - Legal Address
M - Mailing
N - Birth (birth address not otherwise specified
O - Office
P - Permanent
RH - Registry Home
Enter the guarantor's Address, Country, Zip Code, City, State, and County in the fields provided. NOTE: In cases when the guarantor has the same address as the patient (e.g., the guarantor is the parent or spouse), click Copy address from MPI on the guarantor's Demographics tab to copy the address from the patient’s Demographics tab. Note the following about the address fields:
Two Address fields are provided to record two addresses, e.g., mailing address and physical address.
Entering the Zip Code first will populate the City and State fields, unless the zip code is not in the Zip Codes master file. A message is displayed if the zip code is unknown, in which case, manually enter the city and state.
The County and Country fields are populated from entry of the zip code if they are linked via the Zip Codes master file. If not, use the drop-down lists to select the appropriate county and country.
Changes to the Address/Address Type in this screen update the primary address of the guarantor's record in the People master file.
Check the Bad Address box to indicate the guarantor has a bad address on file. A red message will flash in the MPI and on the Guarantor screen until a new address is entered and the Bad Address box is unchecked.
If the Bad Address box is checked, statements are not generated for this guarantor.
Enter the guarantor's Home Phone, Work Phone, Cell Phone, Other Phone, and Fax information in the corresponding fields, including country code, area code, 7-digit local number, extension, and notes. This information is displayed on the guarantor's Additional Info tab once saved and can be edited directly on the tab if needed.
Phone numbers are formatted as 1-123-456-7890 with the area code required. The country code is defaulted to 1 (for USA) if not entered.
Phone information is included in Syndromic Surveillance ADT messages.
In the Date of Birth field, use the drop-down calendar to select the guarantor's date of birth.
In the Date of Death field, use the drop-down calendar to select the guarantor's date of death, if applicable. If a date of death exists, Deceased is displayed in red next to the Guarantor # field. The message, Guarantor is listed as deceased. Do you wish to continue? is displayed. Click Yes to use the guarantor, or click No to select a different guarantor. NOTE: The date of death cannot be less than the date of birth.
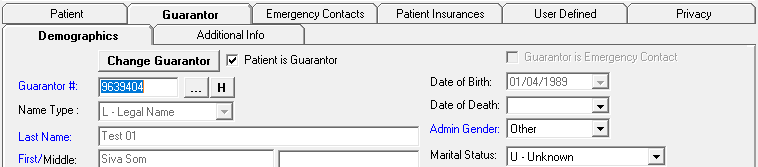
In the Admin Gender field, use the drop-down list to select the guarantor's gender. Valid options are Female, Male, Unknown, or Other.
In the Marital Status field, use the drop-down list to select the guarantor's marital status. Valid options are: D-Divorced, M–Married, P–Life Partner, S–Single, U–Unknown, W–Widowed, and X-Legally Separated.
In the SSN field, enter the guarantor's Social Security Number.
In the Drivers Lic No field, enter the driver's license number of the guarantor.
In the E-Mail field, click the ellipsis button to enter, edit, or remove the guarantor's e-mail information. The E-Mail Information window is displayed.
Edit the E-Mail Address, E-Mail Type (Home, Work, Other), and E-Mail Comment fields as needed. The E-Mail Type and E-Mail Comment fields are enabled only when an e-mail address is entered.
If the guarantor has no e-mail address, check the Does not have an e-mail address box. NOTE: If this box is checked, the text, No e-mail address, is displayed in the E-Mail field on the Guarantor tab, and the registration clerk is not prompted to ask for the e-mail address.
Click OK to save your changes and return to the Add Guarantor window, or click Cancel to exit the window without saving.
NOTE: The edited information is not permanently saved until Save is clicked on the Add Guarantor screen. This information is displayed on the guarantor's Additional Info tab once saved and can be edited directly on the tab if needed. (This is a Meaningful Use requirement.)
In the Relationship field, use the drop-down list to select the guarantor's relationship to the patient (e.g., Father, Mother, Spouse, Attorney, etc.). This field is set to Self when the Patient is Guarantor box is checked. When editing the MPI, this field is made blank if the guarantor is changed to another guarantor.
The message, Guarantor Relationship requires updating - select the correct Relationship value from the selection list. Previous value was: xxxxxxxxx is displayed for an invalid value.
In the Employer field, click the ellipsis search button to open the Employers window to select the guarantor's employer. Enter your search criteria to locate and select the employer. If the guarantor's employer is not found in the Employers file, click New and add the employer. See Employers for detailed instructions.
In the Status field, use the drop-down list to select the guarantor's employment status. Choose P-Permanent, I-Inactive, B-Bankrupt, or T-Temporary.
In the Financial Status field, enter a user-defined status that can be used to indicate something about the guarantor, e.g., employee, board member. This status displays in the Balance Inquiry and Transaction Entry.
In the Comments box, enter any comments (free text). Anything entered is for informational purposes only.
Check the Print Statements box if statements are to be generated for this guarantor. If not checked, this guarantor will not receive statements. NOTE: This field is based on the setting in the Patient Registration System Parameters and can be changed.
To prevent statements from being sent for specific financial classes, leave the Send Statements option in the Financial Classes master file unchecked.
Check the Print Letter Series box if the guarantor should receive letters based on the criteria set up in Collections. This field is based on the setting in Patient Registration System Parameters and can be changed.
Check the Finance Charges box to assess finance charges for this guarantor for bills that meet the criteria. This field is set based on the setting in the System Parameters screen and can be changed if needed.
Click Save to save the guarantor record.
If the guarantor is not the patient, check the Guarantor is Emergency Contact box on the Demographics tab if the guarantor is the patient's emergency contact. Checking the box populates the guarantor information into the Emergency Contacts tab. NOTE: The patient cannot be his/her own emergency contact.