The Calendar Definition master file is used to set up payroll calendars for each pay frequency/paid date combination that resides in the employee base and payroll processes. These calendars are used to track employee hours of service by week, pay period, and ACA month to which the hours belong.
Multiple calendars can be set up, as different groups may be paid at different frequencies and pay periods. Each pay frequency should have one calendar based on the pay period/paid date rule. For instance, if everyone is paid bi-weekly, you would need one calendar. However, if you pay hospital bi-weekly on week 1 and the nursing home bi-weekly on the opposite week, you would need a calendar for both instances. NOTE: There is no need to create separate calendars by year as the year-end process automatically extends calendar dates into the next year for you.
The Affordable Care Act (ACA) reports/forms use this master file to report health care coverage and statistical data in compliance with ACA reporting requirements.
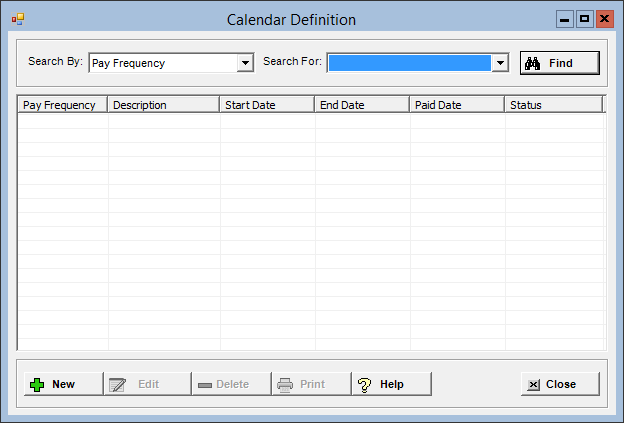
To access the Calendar Definition window, go to Payroll > Master Files > Calendar Definition. [+]
The following tasks can be performed from this window:
To display all calendar definitions on file, click Find without entering any search criteria. The grid displays the calendar definitions by Pay Frequency. You can click any column heading to sort the list based on that column. Click the column heading again to reverse the order (i.e., ascending or descending).
Change or narrow your search results by entering specific search criteria:
The Search By field displays Pay Frequency, and cannot be edited. In the Search For field, use the drop-down list to select the specific pay frequency to search for. Choose 1-Weekly, 2-Bi-Weekly, 3-Semi-Monthly, or 4-Monthly to retrieve all records that match the criteria.
Click Find to display the search results in the grid.
If the Populate Affordable Care Act Hours Detail setting in Payroll System Parameters is set to 2-ACA Hours of Service Reported, the End of Year process automatically populates the next new year's weekly and bi-weekly calendar definition at year end close processing. The list will display the calendar with the new year's first payroll data.
Follow the instructions below to add a calendar.
Be sure to use dates that represent a full year, as the system does not require it.
To create a calendar automatically for either a weekly or bi-weekly pay frequency that spans more than one year, simply enter the first pay period start date of the earliest time frame, as well as the Date of Pay for that period, and the system will create the calendar up through the current payroll year. For example, enter the first payroll date for 2014, and the system will create all of the dates from 2014 through the current year.
There is no need to manually create nor maintain dates for future years until after the payroll year-end process is performed. The year-end process automatically extends calendar dates into the next year for you, at which time you can edit the dates if needed.
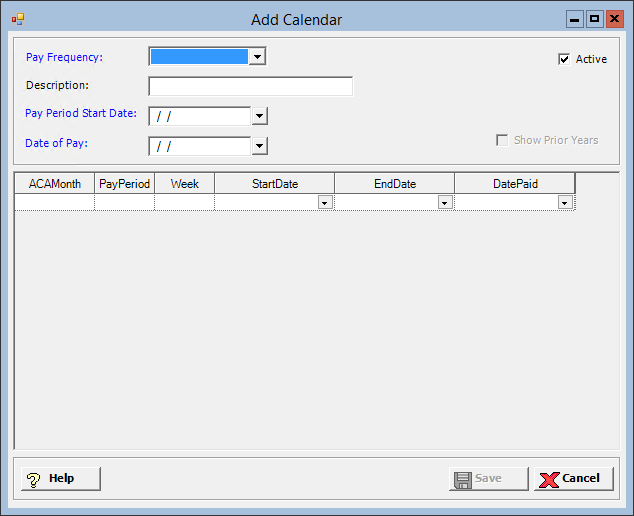
Click New at the bottom of the Calendar Definition window. The Add Calendar window is displayed. [+]
In the Pay Frequency field, use the drop-down list to select the pay frequency. Choose 1-Weekly, 2-Bi-Weekly, 3-Semi-Monthly, or 4-Monthly.
In the Description field, enter a meaningful description of the calendar definition (20 characters or less). NOTE: When creating a semi-monthly or monthly calendar, it may be useful to include the year as part of the calendar name, as a new calendar must be built for each year.
In the Pay Period Start Date field, use the drop-down calendar to select the date of the first pay period in the calendar.
In the Date of Pay field, use the drop-down calendar to select the date of pay for the first pay period in the calendar.
If 1-Weekly or 2-Bi-Weekly is chosen in the Pay Frequency field, the grid automatically populates the necessary data into the future for all pay periods that end in the current year. Use the vertical scroll bar to view all the data.
If 3-Semi-Monthly or 4-Monthly is chosen, the grid displays the required header input in the first row, and the ACA Month (in mmm format, e.g., Jan, Feb, Mar), End Date, and Date Paid must be manually entered for each period.
Column definitions:
ACAMonth - Displays in mmm format for 1-Weekly and 2-Bi-Weekly based on pay period; must be entered for 3-Semi-Monthly and 4-Monthly. For 2-Bi-Weekly, if either week in the two-week pay period contains the first day in a month, then both weeks in that pay period are assigned that month, so both weeks in a pay period are assigned the same ACA month. The ACA month is assigned based on the month value of the period end date. NOTE: Adherence to the rules governing ACA should be considered; Regulation 4980H provides this definition.
PayPeriod - Next sequential pay period; can be edited until saved.
Week - Sequentially numbered for 1-Weekly and 2-Bi-Weekly; can be edited until saved (e.g., 1 is the default when calendar begins mid-year; can override the week number if needed).
StartDate - First row displays from header input. Each consecutive row is calculated to be the day following the End Date of the previous row.
EndDate - Displays the last day of the pay period and increments by pay period length; must be entered for 3-Semi-Monthly and 4-Monthly; can be edited.
DatePaid - First row displays from header input. Each consecutive row is calculated and increments by pay period length for 1-Weekly and 2-Bi-Weekly; must be entered for 3-Semi-Monthly and 4-Monthly for subsequent pay periods; can be edited.
Check the Show Prior Years box to view calendar dates for prior years. The grid will show all dates that have occurred since the calendar was created. Leave the Show Prior Years box unchecked to view dates for the current payroll year only. This option is relevant for the Weekly and Bi-Weekly pay frequencies only, and is disabled for the Semi-Monthly and Monthly pay frequencies.
The Active check box defaults to checked, indicating that the calendar definition is available for use in the Centriq system. Uncheck the box to make the calendar definition unavailable/inactive.
Click Save to save the calendar definition and close the window, or click Cancel to close the window without saving. The message, This calendar already exists, is displayed when the calendar dates match the dates of another calendar of the same pay frequency.
The Edit button allows you to edit the calendar definition field values (specifically ACA Month, End Date, and Date Paid fields), or change the active/inactive status of a calendar definition.
A calendar may need to be edited occasionally for irregular payroll processing purposes, e.g., when a holiday falls on the normal paid date, you may want to adjust the paid date forward or backward. You may also need to adjust the length of a payroll by adjusting the end date. Not all pay periods that are irregular need to be added to a calendar; as long as the pay frequency and paid date match the employee master and payroll processing, the translation to ACA month will occur.
New rows cannot be added nor rows deleted from the calendar.
Only dates for the current year are viewable. To see dates from a previous year, contact Centriq for assistance.
In the Calendar Definition window, find and select the calendar definition that you want to edit.
Click Edit. The Edit Calendar window is displayed.
Edit the ACA Month, End Date, and Date Paid fields (in the grid) as needed; refer to the field descriptions from To create a calendar definition (above). NOTE: The Start Date is a calculated field and cannot be manually edited. To change a Start Date, edit the End Date of the previous row, which will recalculate the rest of the calendar.
Click Save to save your changes and close the window, or click Cancel to exit without saving.
Follow the instructions below to delete a calendar definition from the master file if it is not in use. NOTE: You can also choose to deactivate the calendar definition, rather than delete it, by unchecking the Active box in the edit screen.
In the Calendar Definition window, find and select the calendar definition that you want to delete.
Click Delete. The following verification message is displayed: You are about to remove the selected calendar. This action cannot be undone once completed. Removing a calendar will not change payroll data. Calendars that are removed will need to be manually recreated to retain full ACA compliance and functionality. Press OK to resume removal or Cancel to exit without removing the calendar.
Click Yes to delete the calendar definition, or No to keep it.
Follow the instructions below to display and/or print a list of calendar definitions on file.
In the Calendar Definition window, choose your search criteria and click Find to display the calendar definitions that you want to print. All records that are visible in the grid will be included in the report.
Click Print. The report is displayed in the Report Viewer, where you can save the list to the PC/network or print the list to an assigned printer. See To preview the report for more information on options within the viewer.