The Financial Classes master file is used to set up the major payers in which to categorize each insurance company. Financial classes are used to categorize payment sources for billing rules, and reporting, statistical, and inquiry purposes.
When setting up the Insurance Companies master file, each insurance company is assigned a financial class. A 2-character code is assigned to identify the financial class and a financial class type (such as Blue Cross, Commercial, HMO, etc.). The Financial Classes master file also contains physician licensing requirements, and options for sending statements, excluding collection, and charging finance charges.
Setup considerations: When adding a financial class to the Financial Classes master file, also determine whether the new financial class requires setup in other Centriq master files. Click here to view a list >> [+]
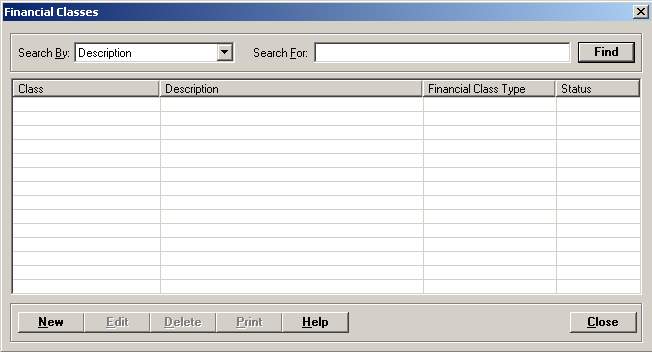
To access the Financial Classes window, go to Patient Registration > Master Files > Financial Classes. [+]
The following tasks can be performed from this window:
To display all financial classes on file, click Find without entering any search criteria. The grid displays the financial classes by Description in alphabetical order. You can click any column heading to sort the list based on that column. Click the column heading again to reverse the order (i.e., ascending or descending).
Change or narrow your search results by entering specific search criteria:
In the Search By field, use the drop-down list to select how you want to search the list and sort the results. Select from the following sort options: Class, Description, or Financial Class Type.
In the Search For field, enter the specific term to search for based on the Search By field choice. Enter all or part of the term to retrieve all records that match the criteria.
Click Find to display the search results in the grid.
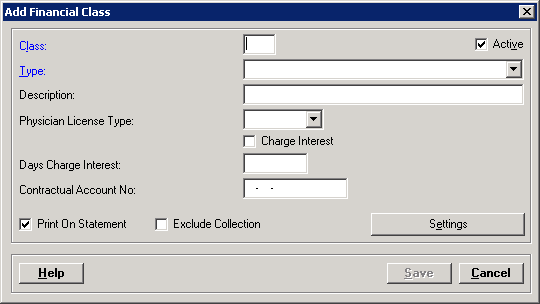
Click New at the bottom of the Financial Classes window. The Add Financial Class window is displayed. [+]
In the Class field, enter a 1-2 digit code (alpha or numeric) that identifies the financial class.
In the Type field, use the drop-down list to select the type of financial class to be added. Examples include: Medicaid, Blue Cross, State Welfare, PPO, or Tri-Care. NOTE: These values are hard coded and used with various system functions (e.g., forces the MSP Questionnaire, Self-Pay displays balances as "private pay" subtotals).
Each financial class type is associated with the 837 source of pay.
Financial Class Type |
UB Source of Pay |
1500 Source of Pay |
BC/BS |
BL |
BL |
Blue Cross |
BL |
BL |
Blue Shield |
BL |
BL |
Champus |
CH |
CH |
Commercial |
CI |
CI |
HMO |
HM |
HM |
Medicaid |
MC |
MC |
Medicare Part B |
MA |
MB |
Other |
OF |
OF |
POP |
12 |
12 |
Self-Pay |
09 |
09 |
State Welfare |
TV |
TV |
Tri-Care |
CH |
CH |
Workers Comp |
WC |
WC |
Medicare |
MA |
MA |
All Others |
ZZ |
ZZ |
In the Description field, enter a description of the financial class.
In the Physician License Type field, use the drop-down list to select one of the following physician license types. This is utilized for staff (secondary qualifiers with 837 billing), but is not required on Self-Pay financial classes. NOTE: Additional setup in the Staff master file is required to allow secondary provider numbers to be submitted in the 837 files.
UPIN (default)
Federal
State
Special
Check the Charge Interest (Finance Charges) box if interest is to be charged for this financial class.
In the Days Charge Interest field, enter the number of grace days from the last Self-Pay payment date for the guarantor before charging interest (finance charges) for this financial class. Leave blank if not applicable.
In the Contractual Account No. field, enter the GL account number where the contractual adjustment will be sent. If exception records are created to adjust a portion of a bill at the time of the bill post, the GL number for the write-off/adjustment can either be derived from this Financial Classes master file or from the patient class/financial class crosswalk (as set up in the Patient Classes > Financial Class Cross Reference tab). The Contractual GL field in the Exception record window determines which option will be utilized.
The Print on Statement box indicates whether guarantor accounts with the financial class will receive statements, and defaults to checked. Uncheck the box if guarantors should not receive statements for this financial class. If printing pending statements for insurance companies, check the box to print statements. NOTE: This option overrides the statement exception thresholds. A statement is produced for pending insurance regardless of the self pay balance when the Print On Statement check box is checked.
Check the Exclude Collection box if bills associated with the financial class should not be included in the Guarantor Worklist process.
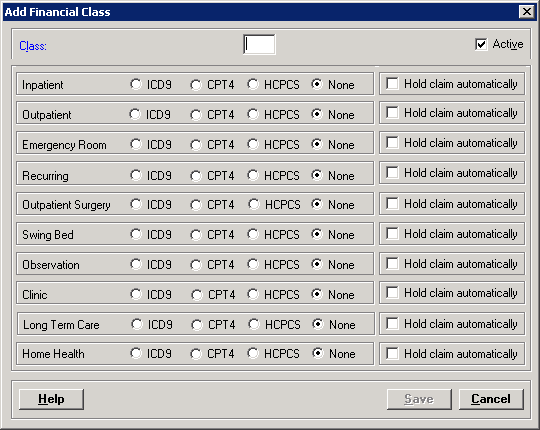
Click the Settings button to set the ICD procedure code type and Hold claim automatically flag for each patient class type. The Add Financial Class window is displayed. [+]
The financial class is automatically displayed from the Financial Class setup window.
Procedure codes are utilized for Box 74 of the UB. Do not use CPT4 or HCPCS codes as those values print in Box 44 and are not controlled by this master file. Select ICD9 to print the ICD9 or ICD10 procedure code in Box 74. Select None to leave Box 74 blank. None is the default procedure code type for each patient class type; edit as needed.
Check the Hold claim automatically box to flag all claims as held as soon as the claim is created/built, preventing them from downloading or printing without a user reviewing each claim and releasing the On Hold check box. The Hold claim automatically functionality is used when billing clerks must review claims prior to submission to the insurance company, either by EMC vendor or hard copy. For example: All Workers Compensation claims for emergency visits can be held for billing review and released once the billing staff is satisfied all required information is present. In Insurance Processing, the episode's On Hold claim shows a flashing envelope (mail) icon with a red X to indicate the claim is On Hold, which is an additional hold outside of the Coded Complete option in the HIM application. Currently, no report exists to show claims placed on hold, but users can produce a list of claims not downloaded for review.
Click Save to save the settings and return to the Add Financial Class window.
The Active check box defaults to checked, indicating that the financial class is available for use in the Centriq system. Uncheck the box to make the financial class unavailable/inactive.
Click Save to save the new financial class and close the window, or click Cancel to close without saving.
The Edit button allows you to edit the financial class field values or to change the active/inactive status of a financial class.
In the Financial Classes window, find and select the financial class that you want to edit.
Click Edit. The Edit Financial Class window is displayed.
Edit the fields as needed; refer to the field descriptions from To create a financial class (above).
Click Save to save your changes and close the window, or click Cancel to exit without saving.
Follow the instructions below to delete a financial class from the master file if it is not in use. Note: You can also choose to deactivate the financial class, rather than delete it, by unchecking the Active box in the edit screen.
In the Financial Classes window, find and select the financial class that you want to delete.
Click Delete. A verification message is displayed.
Click Yes to delete the financial class, or click No to keep it.
Follow the instructions below to display and/or print a list of financial classes on file.
In the Financial Classes window, choose your search criteria and click Find to display the financial classes that you want to print. All records that are visible in the grid will be included in the report.
Click Print. The report is displayed in the Report Viewer, where you can save the list to the PC/network or print the list to an assigned printer. See To preview the report for more information on options within the viewer.