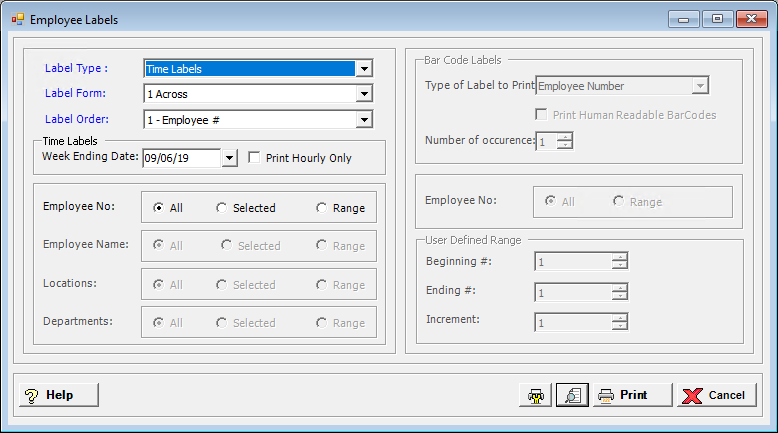
The Employee Labels screen allows you to print three different types of employee labels: time card labels, mailing labels, and bar code labels.
The time card label includes the employee’s primary location and department, the employee number and name, and the week ending date.
The mail label includes the employee’s name, address, and employee number.
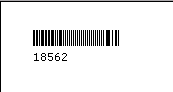
The bar code label has the bar code of the employee’s number or a user-defined number, and optionally the number below the bar code.
To access the Employee Labels window, go to Payroll > Reports > Employee Labels. [+]
In the Label Type field, use the drop-down list to select the type of label to print. Choose from the following options:
Time Labels (default)
Mail Labels
In the Label Form field, use the drop-down list to select the format of the label. Choose from the following options:
1 Across - (default) dot matrix printer needed
2 Across Avery 5262 - laser form
3 Across Avery 5260 - laser form
In the Label Order field, use the drop-down list to select how to sort the labels. Choose from the following options:
1 - Employee # - (default) To print in alphanumeric order by employee number.
2 - Employee Name - To print in alphabetical order by employee name.
3 - Location/Department Employee Number - To print in alphanumeric order by location code and department code, and then by employee number.
4 - Location/Department Employee Alpha - To print in alphanumeric order by location code and department code, and then by employee name.
The Week Ending Date field determines the date to print on the label, and defaults to the current date. To edit, use the drop-down calendar to select the date to print on the label.
Check the Print Hourly Only box to print labels for hourly employees only, and not salaried employees. Leave unchecked to print labels for all employees.
The Employee No. field is available when Label Order = 1 - Employee # or 3 - Location/Department Employee Number. Specify the employee numbers to print labels for. Choose All (default), or choose Selected or Range to specify which ones to include. See Reporting/Printing Functions for detailed information on using the Selected and Range options.
The Employee Name field is available when Label Order = 2 - Employee Name or 4 - Location/Department Employee Name. Select the option that determines the employee names to include in the print job. Choose All (default), or choose Selected or Range to specify which ones to include.
The Locations and Departments fields are available when Label Order = 3 - Location/Department Employee Number or 4 - Location/Department Employee Name. Specify the locations and departments to include in the print job. Choose All (default), or choose Selected or Range to specify which ones to include.
Click the Preview button (located to the left of the Print button) to view the Employee Labels in the Report Viewer, or click Print to print the labels to the designated printer. See Reporting/Printing Functions for detailed information on using the Printer Settings and Print Preview buttons.
Click Cancel to exit.
In the Label Type field, use the drop-down list and select Bar Code Labels.
In the Label Order field, use the drop-down list to select how to sort the labels. Choose from the following options:
1 - Employee # - (default) To print in alphanumeric order by employee number.
2 - Employee Name - To print in alphabetical order by employee name.
3 - Location/Department Employee Number - To print in alphanumeric order by location code and department code, and then by employee number.
4 - Location/Department Employee Alpha - To print in alphanumeric order by location code and department code, and then by employee name.
The Locations and Departments fields are available when Label Order = 3 - Location/Department Employee Number or 4 - Location/Department Employee Name. Specify the locations and departments to include in the print job. Choose All (default), or choose Selected or Range to specify which ones to include. See Reporting/Printing Functions for detailed information on using the Selected and Range options.
In the Type of Label to Print field, use the drop-down list to select the type of label to print. Choose from the following options:
Employee Number - To print bar codes based on employee number
User Defined Number Range - To print bar codes based on user-defined numbers.
Check the Print Human Readable BarCodes box to include the readable number (employee or user-defined) with the bar code. Leave unchecked to exclude the readable number.
The Number of occurrence field defaults to 1. To edit, use the arrow buttons to select the number of times to print the bar code.
The Employee No. field is available when Type of Label to Print = Employee Number. Specify the employee numbers to include to print labels for. Choose All (default), or choose Range to specify a range of employee numbers to include.
The User Defined Range fields are available when Type of Label to Print = User Defined Number Range. Specify a range of user-defined numbers to print labels for. Enter the first number in the Beginning # field, and the last number in the Ending # field. Then, in the Increment field, use the arrow buttons to enter the number to increment the user-defined numbers by.
Click the Preview button (located to the left of the Print button) to view the Employee Labels in the Report Viewer, or click Print to print the labels to the designated printer. See Reporting/Printing Functions for detailed information on using the Printer Settings and Print Preview buttons.
Click Cancel to exit.
Time Card Label Example - Two Across Format

Mail Label Example - Three Across Format

Bar Code Label Example