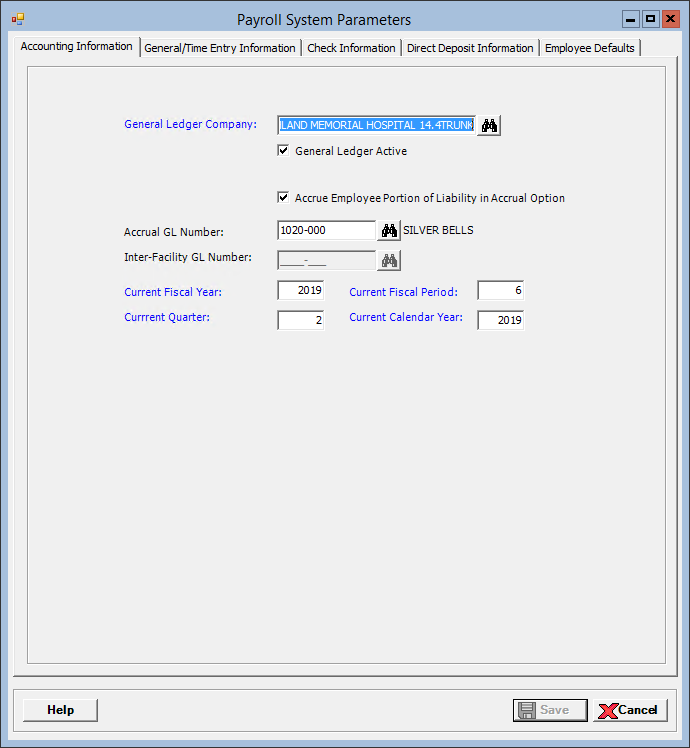
The System Parameters window contains information critical to the proper functioning of the Payroll program. System parameters regulate the behavior of the system. By editing fields within the System Parameters window, you will able to customize this module’s behavior to fit your company’s needs.
To access the Payroll System Parameters window, go to Payroll > Master Files > System Parameters. [+]
Enter or edit the information in following tabs:
Click Save to save your work and close the window, or click Cancel to exit the window without saving.
In the General Ledger Company field, click the Find button to select the company that does the General Ledger. The company ID for this company is written on all journal entries created by the Payroll application.
Check the General Ledger Active box to indicate the Centriq General Ledger application is being used with the Payroll application, or uncheck this box if it not being used. This box is checked by default. NOTE: If this box not checked, the Chart of Accounts is included in the Master Files menu so that records can be created in that window.
Check the Accrue Employee Portion of Liability in Accrual Option box if you want to accrue liabilities when either forward or backward accruals are generated.
In the Accrual GL Number field, click the Find button to select a valid general ledger account number to use for writing debit and credit entries when either the forward or backward accrual option is used.
In the Inter-Facility GL Number field, click the Find button to select a valid general ledger account number to use for balancing journal entries between facilities. This field is only active when the Allow Multiple Balance Sheets box is checked in the Companies master file in Centriq Administration.
The Current Fiscal Year field defaults to the current year for payroll, and is used in all journal entries. This is entered at the time of installation and is incremented by the End of Period process at the end of the fiscal year. NOTE: A company calendar must be set up for the current year.
The Current Fiscal Period field defaults to the current fiscal period for payroll, and is used in all journal entries. This is entered at the time of installation and is incremented by the End of Period process.
The Current Quarter field defaults to the current calendar quarter for payroll. This is used in check posts and quarterly reporting. This is entered at the time of installation and is incremented by the End of Quarter process.
The Current Calendar Year field defaults to the current calendar year. This is used in check posts and reporting. This is entered at the time of installation and is incremented by the End of Year process.
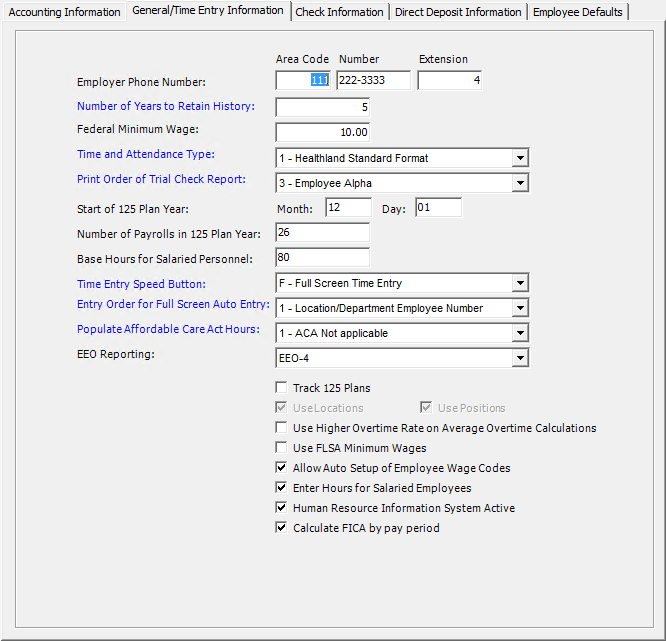
In the Employer Phone Number field, enter your employer phone number in the fields provided, including the area code and phone number, as well as the extension, if needed. This phone number is included on the paycheck and direct deposit form. The pay statements are printed without a phone number if these fields are left blank.
In the Number of Years to Retain History field, enter the number of years to retain employee history. General employee information (address, contacts), wages, deductions, and ECBs are kept for at least five (default) years. The system will remove data older than this limit when End of Year is processed. Edit, if needed.
The Federal Minimum Wage field defaults to the current federal minimum wage.
In the Time and Attendance Type field, use the drop-down list to specify the type of Time and Attendance program used by your company. Select one of the following format options. NOTE: When choosing a format, check with your vendor to determine that your file meets one of the three formats.
0-None
1-Healthland Standard Format - Select to include the weeks worked and meal deduction.
3-Format 1 - Select when the hours for each employee department is on record. This is a comma delimited file.
8-Format 2 - Select when a fixed length file is used.
Refer to the Payroll > Master Files > Time and Attendance menu for more time clock setup.
In the Print Order of Trial Check Report field, use the drop-down list to specify the default option that determines how to sort the trial check report (e.g., by employee, location). Select one of the following options:
1 - Location/Department Employee Number
2 - Location/Department Employee Alpha
3 - Employee Alpha
4 - Employee Number
In the Start of 125 Plan Year field, enter the month (in MM format, e.g., 12) and day (in DD format, e.g., 01) the 125 year began.
The Number of Payrolls in 125 Plan Year field is required only if the Track 125 Plans check box is checked. Enter the number of payrolls included in the 125 plan year. NOTE: An employee must enroll in the 125 plan at the beginning of the plan year. When the 125 plan deduction is taken in the first payroll, the total amount for the 125 plan is calculated as that amount times the number of payrolls.
In the Base Hours for Salaried Personnel field, if the salary wage code is identified by hours, enter the number of hours to default into the Hours column in the Full Screen Time Entry window when salary entries are added to the full screen entry.
In the Time Entry Speed Button field, use the drop-down list to specify which Time Entry window to display when the Time Entry speed button is clicked. Choose Full Screen Time Entry or Single Line Time Entry.
In the Entry Order for Full Screen Auto Entry field, use the drop-down list to specify the default option that determines how to sort the Full Screen Time Entry window (e.g., by employee, location). Select one of the following options:
1 - Location/Department Employee Number
2 - Location/Department Employee Alpha
3 - Employee Alpha
4 - Employee Number
In the Populate Affordable Care Act Hours field, use the drop-down list to specify whether or not your facility uses the Centriq Payroll and Human Resources applications for ACA compliance needs. Choose one of the following options:
1-ACA Does Not Apply - Payroll functionality is unchanged.
2-ACA Hours of Service Reported - Enables the following functions within Centriq Payroll:
Admin > ACA - Merge Hours Detail and Admin > ACA - List/Edit Hours.
Payroll entry requires the week number on all bi-weekly payroll frequency employees.
Post Payroll uses the Calendar Definitions master file to assign the ACA month, and uses the ACA FTE Contributing setting in the Wage Codes master file to direct wage code hours to the ACA FTE calculation.
Admin > End of Year automatically populates the next new year's weekly and bi-weekly calendar definition at year end close processing. The Calendar Definitions master file will list/display the calendar with the new year's first payroll data.
In the EEO Reporting field, use the drop-down list to specify the type of EEO reporting your facility uses. Choose from the following options:
Not Applicable: (Default) Select if your site does not participate in EEO reporting.
EEO-1: Select to enable EEO-1 reporting functions if your site is required to submit EEO-1 information based on federal requirements.
EEO-4: Select to enable EEO-4 reporting functions if your site is required to submit EEO-4 information based on federal requirements.
Check the Track 125 Plans box to have the system keep track of the deductions and reimbursements, and print the balance on the paychecks.
The Use Locations box is checked and cannot be changed. This displays the Location field on windows throughout the Centriq Payroll application (e.g., Employee, Time Entry, etc.) for entry.
The Use Positions box is checked and cannot be changed. This displays the Position field on windows throughout the Centriq Payroll application (e.g., Employee, Time Entry, etc.) for entry.
Check the Use Higher Overtime Rate on Average Overtime Calculations box to use the higher rate when calculating the average overtime rate if the rate is less than the rate in the employee’s wage record.
Check the Use FLSA Minimum Wages box to calculate OT rates by comparing the actual gross wages against the FLSA minimum wages. If the Use Higher Overtime Rate box is also checked, the total wages may be higher. If the change results in a lower amount, the average OT is not used.
Check the Allow Auto Setup of Employee Wage Codes box so that when an entry is made to a new location/department/position for a wage code already set up for the employee’s primary location/department/position, the new record is written to the employee’s wage table with defaults from the primary record.
Check the Enter Hours for Salaried Employees box to require entry of hours for salaried employees when salaried employees are automatically entered in the Full Screen Time Entry window.
Check the Human Resource Information System Active if the Centriq Human Resources application is in use.
Check the Calculate FICA by pay period box to calculate the FICA amount by pay period. If this box is unchecked, the FICA amount is annualized, allowing the system to auto-correct the FICA amount on the next check when needed (e.g., when there is a mistake on a manual check, etc.).
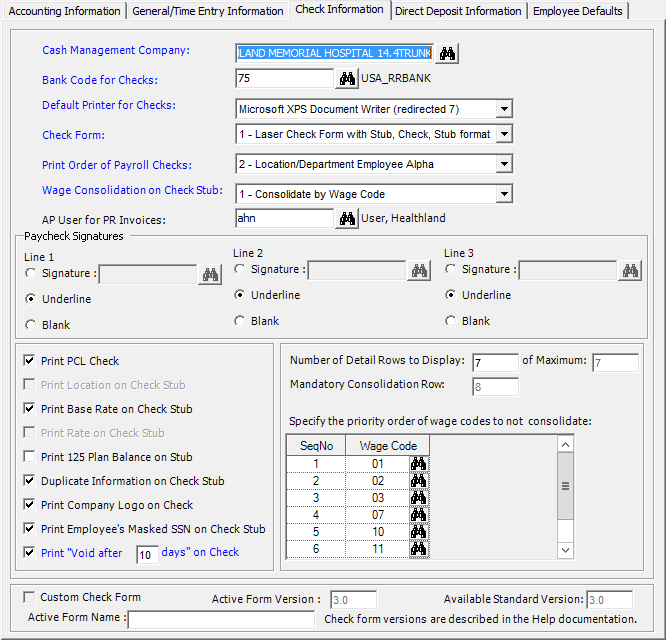
The Check Information tab stores paycheck information, such as the information that will appear on paychecks, the check form, and bank code information. [+]
In the Cash Management Company field, click the Find button to select the company responsible for the management of this bank account. This defaults to the current company.
In the Bank Code for Checks field, click the Find button to select the bank code that identifies the bank written on the payroll check. The cash general ledger account in the Banks master file is used for the journal entries for each check.
In the Default Printer for Checks field, use the drop-down list to select the default printer that will print the paychecks.
In the Check Form field, use the drop-down list to select the check form to use when printing checks. Choose from the following options:
1 – Laser Check form with Stub, Check, Stub format (default)
2 - Laser Check form with Stubs, Check or Check Stubs
3 - Continuous Check Form for a Pin Feed Printer
In the Print Order of Payroll Checks field, use the drop-down list to select the order to print Payroll checks. (NOTE: Payroll checks can be printed in a different order than the order within the trial report.) Choose from the following options:
Location/Department Employee Number
Location/Department Employee Alpha (default)
Employee Alpha
Employee Number
In the Wage Consolidation on Check Stub field, use the drop-down list to how to consolidate wages on the check stub. (NOTE: If one of the first two options below is selected, the Print Rate on Check Stub and Print Location on Check Stub boxes on this tab are unavailable.) Choose one of the following options:
1 - Consolidate by Wage Code
2 - Consolidate by Pay Type
3 - No consolidation (default)
In the AP User for PR Invoices field, click the Find button to specify the AP user for invoices created by the Payroll application. The Payroll application can create an invoice in the Accounts Payable application if you need to make deductions to AP.
In the Paycheck Signatures Line 1, Line 2, and Line 3 fields, select one of the following options to display on the paychecks:
Signature - Choose to select the employee whose signature you want to appear on the paychecks. Click the Find button to select the employee. Only employees with an active user record in Centriq Administration are available for selection. Ensure the employee's signature has been captured in Human Resources > Master Files > Employee Signature. If the signature has not been previously set up, the following message is displayed: No signature image was found for the selected employee. Please add the employee signature in the Human Resources application at Master Files > Employee Signature. The same employee is not allowed on more than one line, and will display the following message if selected: The selected employee is already assigned to a signature line.
Underline - Choose to display a blank line on the paychecks where the user can physically sign.
Blank - (Default) Choose to leave the signature space blank on the paychecks.
Check the Print PCL Check box to print the check form on blank safety paper. The bank name, address, routing number and account number as well as the titles are printed using special fonts and ink cartridges. Before selecting this option, make sure your printer is able to accept PCL commands.
Check the Print Location on Check Stub box to print the employee's location on the pay stub. NOTE: This check box is available only when Wage Consolidation on Check Stub = 3 - No consolidation.
Check the Print Base Rate on Check Stub box to print the base rate for the employee on the pay stub.
Check the Print Rate on Check Stub box to include the pay rate in detail lines on the pay stub. NOTE: This check box is available only when Wage Consolidation on Check Stub = 3 - No consolidation.
Check the Print 125 Plan Balance on Stub box to request the plan year when printing checks or direct deposits. The balance of the 125 plan account will then be printed on the stub. This cannot be used unless the Track 125 Plans box is checked on the General/Time Entry Information tab.
Check the Duplicate Information on Check Stubs box to print the same information on both stubs of laser checks. Otherwise, the information will continue from the first stub to the second. This option does not apply if continuous checks are used.
Check the Print Company Logo on Check box to print the company logo on the paycheck.
Check the Print Employee's Masked SSN on Check Stub box to print the employee's Social Security Number on the pay stub. The SSN is masked to show only the last four digits (e.g., XXX-XX-1234).
Check the Print "Void after ___ days" on Check box to print the message "Void after XXX days" on the paycheck (XXX = number of days as specified). In the field provided, enter the number of days to display in the void message.
In the Number of Detail Rows to Display field, enter the number of detail rows to display on the pay stub.
When the Check Form = 2, Print PCL = Y, and Duplicate Information on Check Stubs = N, up to 26 rows are allowed.
When the Check Form is not 2, or Print PCL = N, or Duplicate Information on Check Stubs = Y, up to 7 rows are allowed.
The following message is displayed upon clicking Save when the number of rows entered is in excess of the limit specified in the Number of Detail Rows to Display field: The number of wage detail rows assigned in the grid is greater than the Number of Detail Rows to Display. Please delete rows from the grid or increase the Number of Detail Rows to Display.
The of Maximum field is view-only, and displays the maximum number of non-consolidated wage codes allowed.
The Mandatory Consolidated Row field is view-only, and displays the sum of the Number of Detail Rows to Display field + 1. This field identifies the last row on the stub where all remaining wage detail will be consolidated as "other."
In the grid displayed, specify the non-consolidated wages codes to display on the check stub. In the Wage Code field, click the Find button to select the wage code. The SeqNo field indicates the order in which the wage code is displayed on the stub, and is view-only. Add and edit wage codes as needed. New rows appear as wage codes are entered, and will not exceed the number of rows specified to display. If you select a wage code that is already assigned to another row, a warning message is displayed. If you clear a row between rows without entering a new code, the message, Please fill or remove empty sequence numbers, is displayed. To delete a wage code from the grid, right-click on the wage code and select Delete. The sequence numbers are refreshed to reflect the deleted code.
The Custom Check Form check box is view-only. If this box is checked, a custom check form is in use. If not checked, the standard form is in use with the specified XSD version. This box is checked by default. Contact Centriq Support if you want to have this value changed to the standard form if your site uses one of our standard check forms.
The Active Form Version check box is view-only. This field identifies the XSD version of the standard paycheck form currently in use, and is NOT used for custom check forms (i.e., Custom Check Form box is checked). This field defaults to 1.0, and will be updated when your site moves from the custom form to the standard form.
The Available Standard Version field is view-only, and displays the most recent available version.
The Active Form Name field is view-only, and displays the filename of the current paycheck form (e.g., rptPrintCheck1.rpt).
Refer to the Description column in the table below for changes included in the corresponding XSD version.
XSD Version |
Description |
3.0 |
Ability to configure up to 3 lines of the paycheck signature area on the paycheck form. |
2.0 |
Ability to print the same type of paycheck form for multiple companies, displays hours worked, displays beginning/ending pay period dates, displays Federal/State filing status and extra withholding amounts; displays deductions and ECBs on long form, and displays deductions on short form. |
1.0 |
Original form |
In the Direct Deposit Form field, use the drop-down list to select the type of direct deposit form to use. Choose 0 - None (default), 1 - Plain Paper, and 2 - Custom Form. If you select None, then no other fields on this tab are required.
In the Default Direct Deposit Printer field, use the drop-down list to select the printer that will print the direct deposit forms.
In the Direct Deposit Cash Management Company field, click the Find button to select the company responsible for the management of this bank account.
In the Direct Deposit Bank field, click the Find button to select the bank from which the ACH transmission file will obtain information. The cash general ledger account in the Banks master file is used for the journal entries for each direct deposit.
In the Payroll Director field, enter the name of the individual the bank should contact if there is a problem with the ACH file.
The Direct Deposit for Regular 1 Checks Only check box is used when an employee has more than one paycheck during a payroll cycle. Check this box to direct deposit the first check and print the remaining check(s) for the employee. Leave this box unchecked to direct deposit all checks for all employees set up for direct deposit.
Check the Direct Deposit for Special Checks box to direct deposit special checks (e.g., bonuses). Leave this box unchecked to not have special checks be direct deposit.
Check the Print ECB box to include the employee’s ECB information in the direct deposit. Leave this box unchecked to exclude the ECB information.
Check the Print Base Rate box to include the base rate for the employee in the direct deposit. Leave this box unchecked to exclude the base rate.
Check the Print Rate with detail box to include the pay rate in detail lines in the direct deposit. Leave this box unchecked to exclude the pay rate.
Check the Print 125 Plan Balance box to request the plan year when printing checks or direct deposits. The balance of the 125 plan account will then be printed on the direct deposit. This cannot be used unless the Track 125 Plans check box is selected on the General/Time Entry Information tab. Leave this box unchecked to not request the plan year.
Check the Print Company Logo on Deposit Form box to print the company logo on the direct deposit form. Leave this box unchecked to exclude the company logo.
Check the Print Employee's Masked SSN on Deposit Form box to print the employee's Social Security Number (SSN) on the direct deposit form. The SSN is masked to show only the last four digits (e.g., XXX-XX-1234). Leave this box unchecked to exclude the SSN on the direct deposit form.
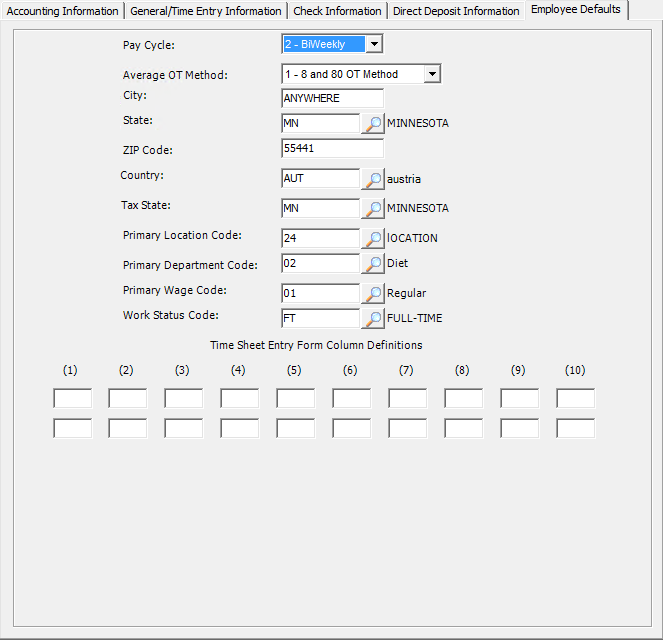
The Employee Defaults tab stores general employee information that can populate in employee-related fields and windows throughout the Payroll application. [+]
In the Pay Cycle field, use the drop-down list to select the option that identifies how often employees are paid. Choose from the following options:
1 - Weekly
2 - BiWeekly
3 - Semimonthly
4 - Monthly
5 - Quarterly
6 - Semiannually
7 - Annually
8 - Daily
9 - Special
In the Average OT Method field, use the drop-down list to select the default average overtime rate method for employees. Choose from the following options:
0-None - No overtime rate calculation; instead, you can select to calculate overtime when calculating Payroll in the Process Checks or Calculate Checks routines.
1-8 and 80 OT - Calculates overtime rate based on 80 hours.
2-40 hours OT - Calculates overtime rate one week at a time. This method is available for employees paid weekly or bi-weekly as specified in the Pay Cycle field.
In the City field, enter the city where most employees live.
In the State field, click the Search button to select the state where most employees live.
In the Zip Code field, enter the zip code where most employees live.
In the Country field, click the Search button to select the country where most employees reside.
In the Tax State field, click the Search button to select the tax state.
In the Primary Location Code field, click the Search button to select the location where most employees work.
In the Primary Department Code field, click the Search button to select the department where most employees work.
In the Primary Wage Code field, click the Search button to select the most common wage code for employees.
In the Work Status Code field, click the Search code to select the most common work status for employees.
In the Time Sheet Entry Form Column Definitions fields, enter up to 10 double-column headings to print on the Time Sheet Entry form.