Signature Capture
A Digital Signature in Centriq is the action of acquiring a signature
(e.g. patient, witness or employee) via a touch screen monitor, a pointing
device on the computer monitor, or Topaz device. The
captured signature image can then be inserted into a MS Word document
at a pre-defined location in the document. The Patient Registration application
allows the capture of both the patient and witness signatures.
Prerequisites
Workstations must have the following software
installed:
Employees must have an employee record in the
Human Resources module. NOTE: If the facility is not using the Centriq
Human Resources application, the witness' signature cannot be saved.
The witness will have to sign the electronic signature device during
each registration.
Form Setup
Task 1: Add Digital Signature Form to Form Library
Forms used for digital signature must be saved in .doc format and saved
in a designated directory, i.e. D:\Program Files (x86)\HLClient\P2A\Reports\Patient
Registration\ prior to adding the form to the Form Library,
Go to Patient Registration > Master
Files > Form Library.
To add a form, click New. To
edit a form, click Find in the
Forms Library window to display a list of forms. Forms that have a Dataset of DS are Digital Signature type forms. Highlight
the form to edit, and click Edit.
The following field settings are required for a Digital Signature form:
See Form Library for
detailed instructions on how to add/edit a form.
Task 2: Add Form to Patient Class
Go to Patient Registration > Master
Files > Patient Classes.
Click Find to display a list
of patient classes and select the patient class to edit. At the bottom
of the Edit Patient Class window, select the Forms
to be Printed tab and click Add
to add the form for this patient class.
The following field settings are required for a digital signature form:
See Patient Classes
for detailed instructions on how to use this screen.
Employee Digital Signature Setup
Employee digital signatures can be set up and saved to the DMS to be
used when signing forms in the Centriq system. This sequence is performed
on a workstation with a Topaz device connected and the appropriate drivers
installed.
Task 1: Create Employee Signature divider in DMS (Filebound)
Go to Centriq Administration
> Maintenance icon > Filebound.
In Filebound Projects, select Human
Resources.
In the Code field, enter
a code (e.g., EMPSIGN), and
in the Description field,
enter EMPLOYEE SIGNATURE.
Click Add.
Task 2: Set up User Role access to divider
In Centriq Administration,
select User icon > Role.
Locate the user role(s) that must access the Employee Signature
divider (e.g. Human Resources and Patient Registration related roles)
and select the Divider Security icon
(next to role Description).
In the FileBound Project field, select Human
Resources.
Under Divider Name,
locate the EMPLOYEE SIGNATURE
divider line, and assign Full Access
under Access Level.
Click Save.
Task 3: Set up User Role access to Employee Signature screen
Go to Centriq Administration
> User > Role.
Locate the user role and click the Edit
icon.
Under Application, select
Human Resources.
Under Secure Items,
locate Menu - Master - Employee Signature,
and assign the correct Access Level
for the user role.
Click Save.
Task 4: Create employee digital signature
An employee record must exist in the Human Resources module
to create a digital signature and digitally sign forms.
Go to Human Resources >
Master Files > Employee Signature.
In the Employee Signature window, click the Find
button to search for the employee.
Upon selecting the employee, Signature
Not Found is displayed if the signature does not exist. Choose
from the following options:
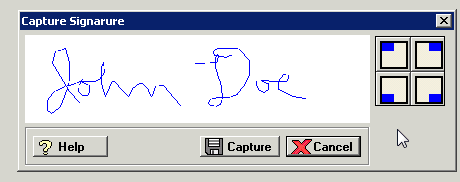
Click Sign Screen
to display a window for capturing the user's signature via touch
screen, mouse, or Stylus input device. Click Cancel
to rewrite the signature or if the signature is not provided.
[+]
If the Topaz signature pad is installed, the Sign
Topaz button is enabled on the Digital Signature screen.
Ensure that the Topaz signature pad is connected, and click Sign Topaz to sign using the
signature pad. A dialog box is displayed showing the signature
as it is applied on the signature pad so that it can be verified
before saving. Click Clear Display
to rewrite the signature or click Cancel
to cancel and exit.
Once the signature is entered, click Capture.
The signature is displayed in the signature area.
Click Close to close
the Employee Signature window. The digital signature is now saved
in the DMS and is available when signing forms via the Apply
Stored button. For example, in Patient Registration when signing
a Patient Consent form, the Apply
Stored button is enabled when a digital signature exists.
To electronically sign a digital form
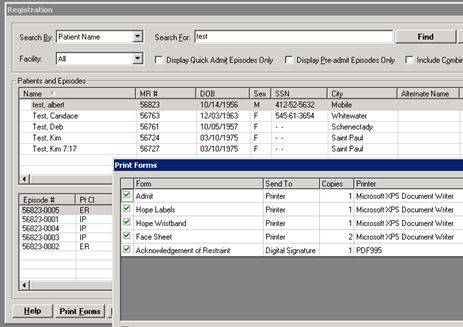
In the Registration window with the patient selected, click
Print Forms. The Print Forms
window is displayed with a list of available forms for that patient
class. [+]
Digital forms are indicated in the Send
To column as Digital Signature.
Check the box next to the form to select it and click Capture
Signature located at the bottom of the window. An interactive
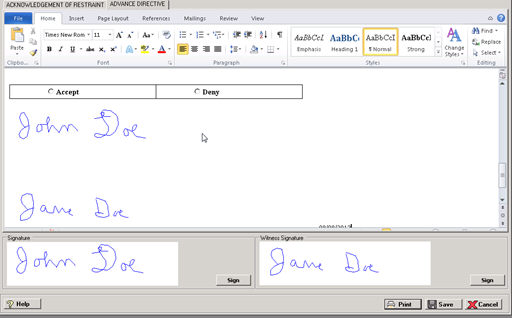
form is displayed where users can make form field selections. [+]
Patient and Witness
areas are available for entering a digital signature. Choose from
the following options:
If the signature is already displayed, click
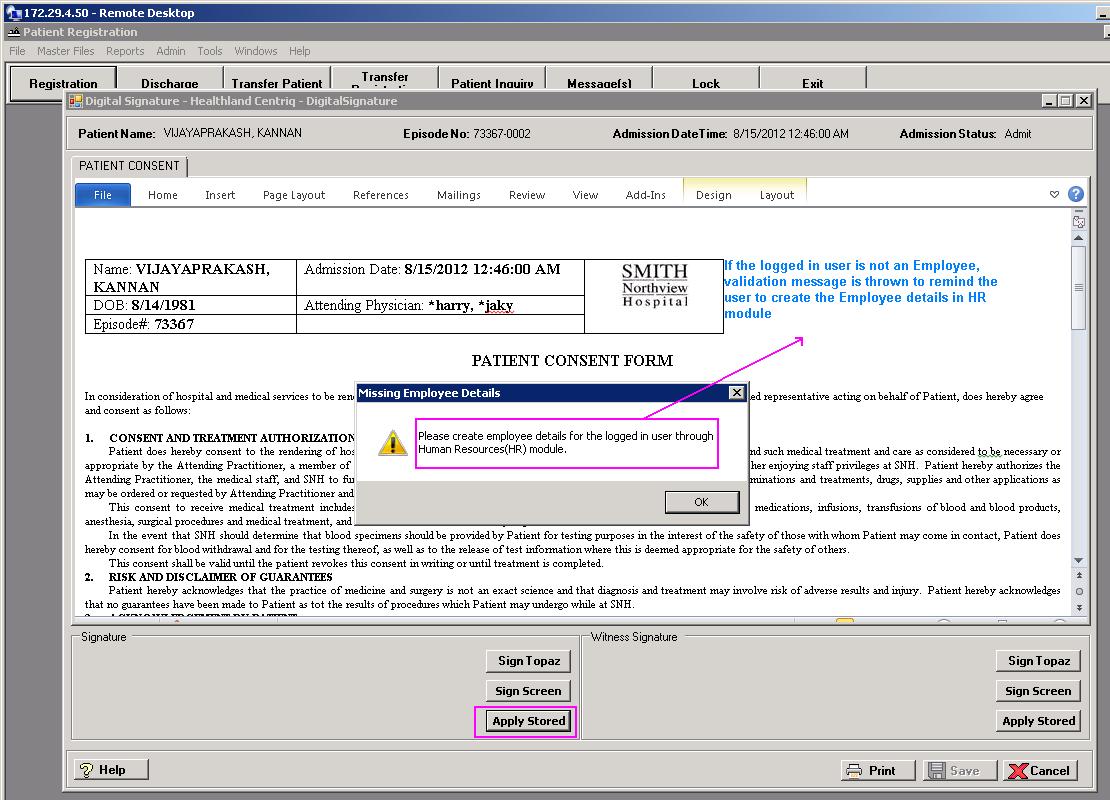
Apply Stored to apply
the stored signature, then go to step 5. If the logged in user
does not have an employee record, a message is displayed instructing
the user to create the employee record in the Human Resources
(HR) module.
Click Sign
Screen to display a window for capturing the user's signature
via touch screen, mouse, or Stylus input device. Click Cancel
to rewrite the signature or if the signature is not provided.
[+]
If the Topaz signature pad is installed,
the Sign Topaz button
is enabled on the Digital Signature screen. Ensure that the Topaz
signature pad is connected, and click Sign
Topaz to sign using the signature pad. A dialog box is
displayed showing the signature as it is applied on the signature
pad so it can be verified before being applied to the document.
Click Clear Display to
rewrite the signature or click Cancel
to not provide the signature. Once the signature is entered, click
Capture.
Once the signature is entered, click Capture.
The signature is displayed at the bottom in the signature area. [+]
If you chose multiple forms
to sign, the Digital Signature window will contain a tab for each form.
After completing steps 3 and 4 for the first form/tab, click the subsequent
tab(s). When you have clicked and taken action on each tab, you can proceed
to step 5 to save the signatures in the document. If you do not click
on each tab, you will receive the error, Object
reference not set to an instance of an object, when you attempt
to save.
Click Save or Print to embed the signature(s) in the document.
The message, Document(s)
saved successfully to DMS, is displayed. Click OK
to close the window.
Once the download file is created,
the following message is displayed if the Company master file in Centriq
Administration is set up for auto-deletion: Downloads
of this type are subject to auto deletion when saved to a local directory.
If not saved to a network or shared drive, this file will be deleted on
MM/DD/CCYY HH:MM. Click OK to continue. Click Cancel to change the download
path.