Use the following instructions to configure the Payroll and Accounts Receivable applications to apply a deduction withheld in Payroll against a bill for the guarantor entered in the employee deduction.
Before you begin...
Payments will be applied to the oldest self pay bill for the guarantor.
All open guarantor batches should be posted or they will get intermingled with the payroll deductions.
A step is included for the Business Office to alert the Payroll Department of changes (+/-) to an employee's AR account.
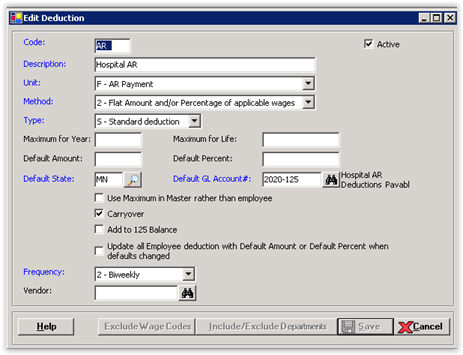
Go to Payroll > Master Files > Deductions and click New.
Enter the following field values:
Code = AR
Description = Hospital AR
Unit = F - AR Payment
Method = 2
Type = 5
Default GL Account = This GL account cannot be the AR account, as this would credit the account twice during the process. Choose a Liability account (e.g., Hospital AR Payable).
Carryover = Check this box to carry over any unpaid amount on an employee deduction to the next year.
Click Save.
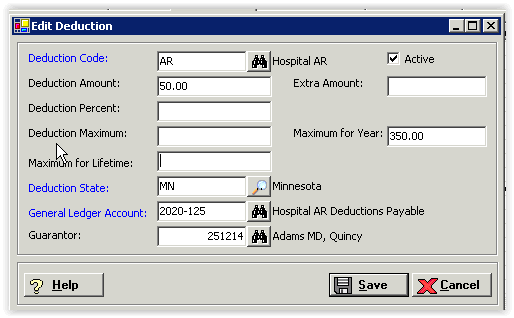
Go to Payroll > Master Files > Employees.
Find and select an employee.
Click the Deductions tab.
Click Single Add.
In the Deduction Code field, click the Find button and select the AR deduction.
In the Deduction Amount field, add the amount of the deduction per deduction period.
In the Maximum for Year field, enter the total AR amount. NOTE: The Maximum for Year is for the current year, with an option to roll over the remaining balance at year end to the next year. If the Carryover box is checked for the deduction in the Deductions master file, the balance is carried over. If not checked, the balance is not carried over at year end.
In the Guarantor field, click the Find button to select the guarantor to whom the payments will be applied.
Click Save.
It is imperative on the Payroll side to re-do the guarantor number attached to the employee for the deduction before the first live payroll. This is due to the full final TDM on the Revenue Cycle side. The ID attached to the guarantor in the background may have changed.
Go to Payroll > Reports > Remaining Deduction Report to generate the report.
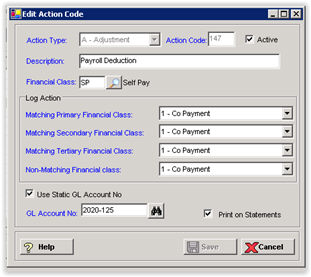
Go to Accounts Receivable > Master Files > Action Codes. Press the Help button in the application for detailed instructions. Take note of the following:
The payroll action code must be an adjustment type code as no cash is involved in this transaction.
The GL Account No. must be the same GL account as selected for the Payroll Deduction that you set up.
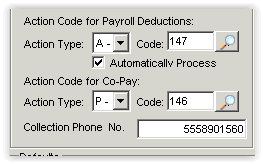
Go to Accounts Receivable > Master Files > System Parameters > Basic tab.
In the Action Code for Payroll Deductions section, select the Action Type and Action Code for the payroll deduction. This must be an Adjustment action code.
Check the Automatically Process check box if you want deductions automatically applied to the bills. Leave unchecked if you want to manually select the option to merge deductions to AR. NOTE: As a best practice, do NOT turn on the automatic process until after a few months of manually merging the deductions.
Click Save.
The deduction is applied to the bill when the payroll is posted if the Automatically Process option in AR System Parameters is selected. Otherwise, the deduction is applied to the bill when the deductions are merged and posted in AR if the Automatically Process option is NOT selected.
If Automatically Process is NOT selected, merge the deductions into AR. Go to Accounts Receivable > Transactions > Merge Payroll Deduction Payments. This process merges the payments into the Transactions by Guarantor file where they can be reviewed and posted.
Go to Accounts Receivable > Transfers > Transfer to New Payer/Financial Class or go to Collections > Guarantor Accounts.
Select the Guarantor #.
Select the Bill No.
Update the Cur. FC field.
Click Save.
Go to Accounts Receivable > Reports > Aging Analysis. In the Financial Class field, select only the payroll deduction financial class for the report.
Provide the Aging Analysis Report to the Payroll Department for input into the employee file.