The Payroll Based Journal Download window allows you to generate an XML file of staffing and census information for submission to the Centers for Medicare and Medicaid Services (CMS), based on Payroll Based Journal (PBJ) regulations.
The initial file contains hires only. After the initial file, create a subsequent file of hires, rehires, and terminations based on specified dates (days, week, month, quarter).
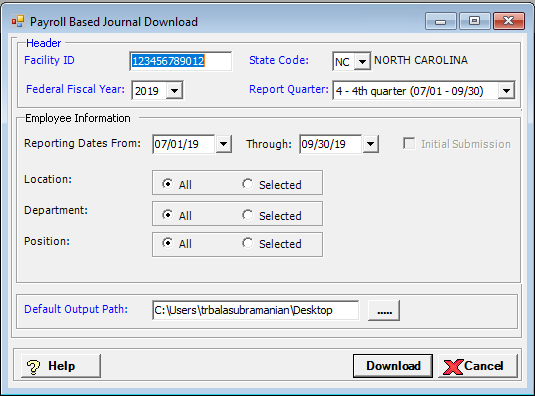
To access the Payroll Based Journal Download window, go to Payroll > Admin > Payroll Based Journal Download. [+]
The information entered in these fields is retained for the next time this window is accessed.
In the Header section, complete the following required fields:
In the Facility ID field, enter your facility's ID.
In the State Code field, use the drop-down list to select your facility's state code.
In the Federal Fiscal Year field, use the drop-down list to select the fiscal year.
In the Report Quarter field, use the drop-down list to select one of the following CMS reporting quarters for the report:
1 - 1st quarter (10/01 - 12/31)
2 - 2nd quarter (01/01 - 03/31)
3 - 3rd quarter (04/01 - 06/30)
4 - 4th quarter (07/01 - 09/30)
In the Employee Information section, enter the following report criteria:
Check the Initial Submission box for your facility's first file submission of PBJ information. This option generates a file that includes all active employees for the reporting quarter for selected locations, departments, and positions. When this box is checked, the date fields are disabled.
In the Reporting Dates From and Through fields, use the drop-down calendar to select a range of dates for the report. All employees with a hire, rehire, or termination date within the range are included in the report. The date range must be within the reporting quarter. NOTE: If employees have more than one rehire date, choose a date span to allow for a single rehire date.
In the Location field, select All to include all locations, or choose Selected to choose specific locations.
In the Department field, select All to include all departments, or choose Selected to choose specific departments.
In the Position field, select All to include all positions, or choose Selected to choose specific positions.
In the Default Output Path field, click the browse button to select the directory for storing the download file.
Click Download to generate the XML file within a ZIP file to the designated download directory. The filename includes a date and time stamp. (NOTE: The fields in the header section, the Default Output Path field, and the Include Employee Information and/or Include Census Information sections are required to create the download file.) If the file fails validation, a message is displayed with a path to the error log.
The following error is displayed when an employee has multiple
hire dates within the reporting period:
The following employee(s)
have more than one hire date within the selected employee information,
hire/rehire date span.
emp #, Name, hire date, hire date
Please reenter the hire/rehire date span to allow for a single hire date
per employee and proceed with download.
Click OK to close the window. Adjust
the date span in the Reporting Date From
and Through fields, and click
Download.
The message, No records available for download, is displayed when no records match the selected criteria. Click OK to close the window.
Once the download file is created, the following message is displayed if the Company master file in Centriq Administration is set up for auto-deletion: Downloads of this type are subject to auto deletion when saved to a local directory. If not saved to a network or shared drive, this file will be deleted on MM/DD/CCYY HH:MM. Click OK to continue. Click Cancel to change the download path.